Cloudy Gamer: Playing Overwatch on Azure's new monster GPU instances
TweetUpdated Dec 17, 2016: Removed mention of the Azure Preview (since it’s now GA), linked to easier method to disable monitors, updated driver link
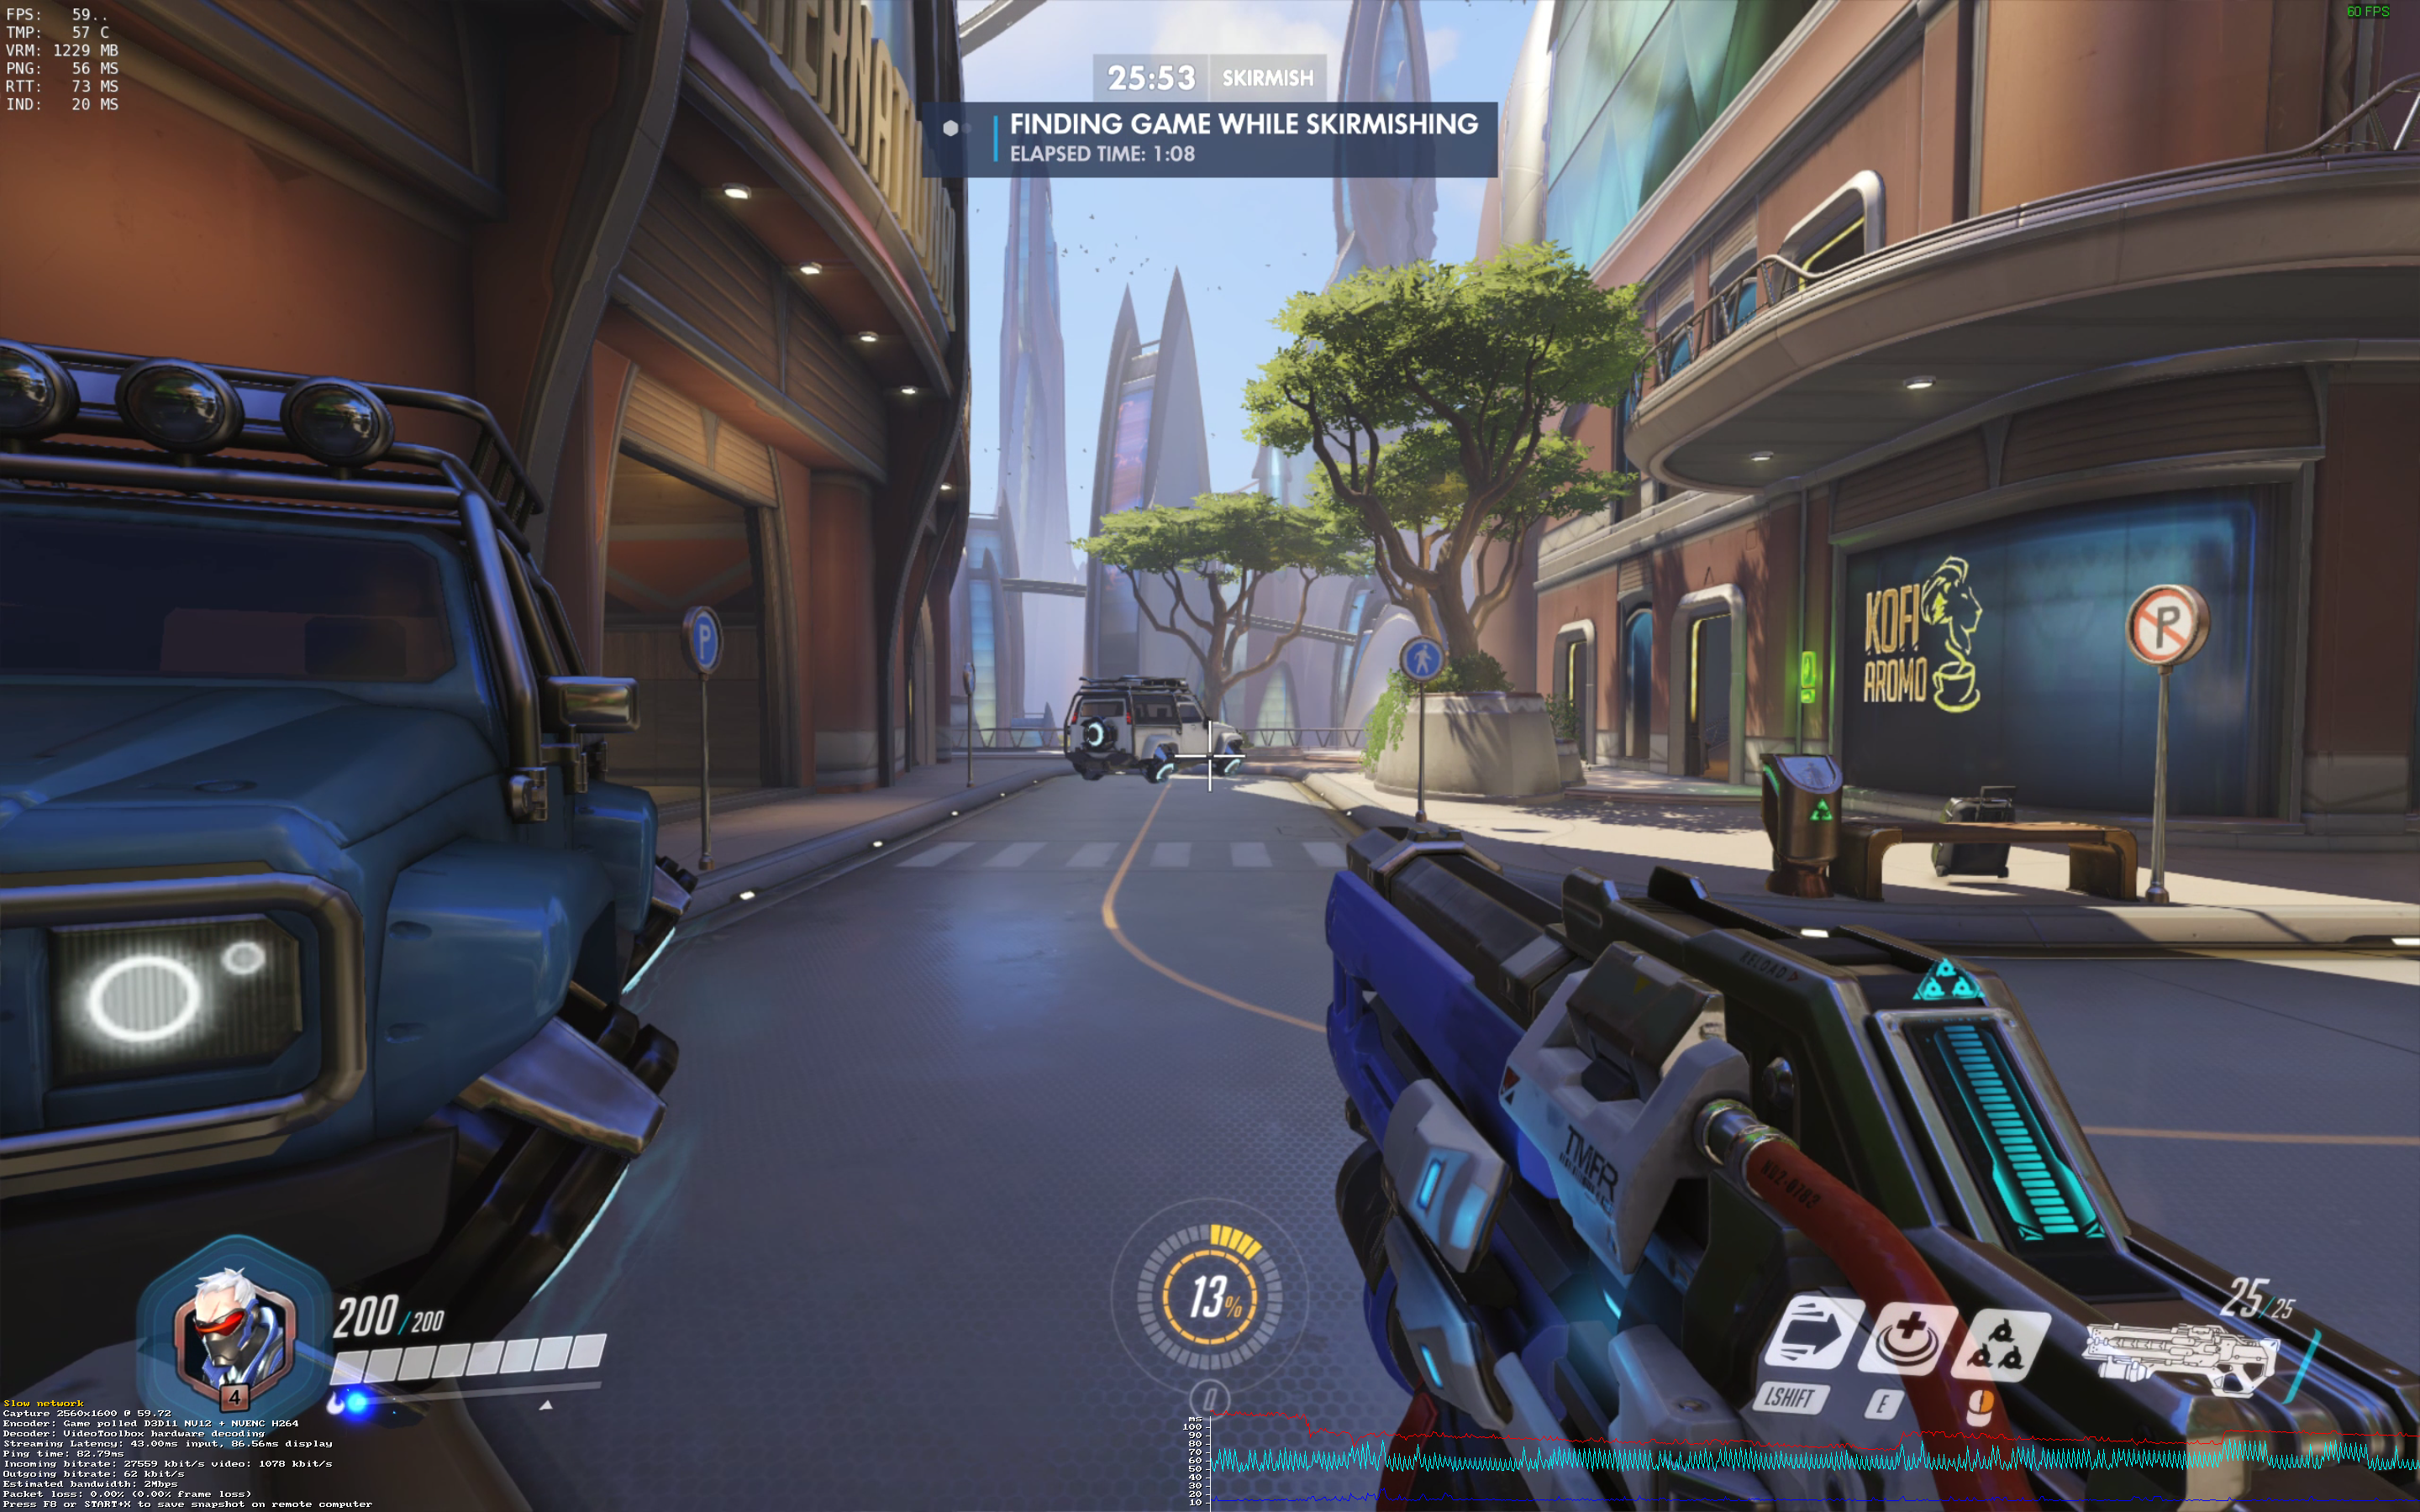
Playing Overwatch at 60FPS, 2560x1600, everything on Epic quality, and streaming from the cloud – not too shabby!
It’s no secret that I love the concept of not just streaming AAA game titles from the cloud, but playing them live from any computer – especially on the underpowered laptops I usually use for work. I’ve done it before using Amazon’s EC2 (and written a full article for how to do it), but this time, things are a little different. Microsoft’s Azure was first to give access to NVIDIA’s new M60 GPUs, completely new beasts that really set a whole new bar for framerate and image quality. They’re based on the newer Maxwell architecture, versus the Kepler cards we’ve used in the past. Hopefully one day we’ll get the fancy new Pascal cards :)
Before going through this article, I strongly recommend you at least skim my EC2 Gaming article from before so you can grasp some of the concepts we’ll be doing here. Basically it’ll come down to this: we’re going to launch an Azure GPU instance, configure it for ultra-low latency streaming, and actually properly play Overwatch, a first-person shooter, from a server over a thousand miles away!
And yes, it seems I always need to repeat myself when writing these articles: the latency is just fine, the resolution is amazing, it can be very cost-effective (if you don’t forget the machine on), and all very practical for those of you obsessed about minimalism (like me). If you’re the hardcore gamer-type who’s knee-jerk reaction regardless of anything is “omg i dont trust anything that doesnt have a Zalman watercooled CPU fan or has a ‘hardware-offloaded’ networking card” or if you’re in some sort of sunk-costs situation of already having spent loads of money on a gaming rig, I strongly recommend not reading this article – it’ll only further infuriate you. :)
Note that in this article I assume you’re on a computer similar to mine (a Macbook laptop running MacOS). That’s not a requirement to do this stuff though. You could be on Linux or Windows as a client, though some of the client-side tooling changes around a bit. You’ll figure it out!
Costs
It’s not the cheapest thing out there, but if you’ll just be playing here and there it can be. Like in the past, the majority of the bill will probably come from bandwidth usage from the server (especially if youre doing 30+ MBit/s). Also remember, there’s $0 upfront cost here. This contrasts dramatically to the thousands of dollars you’d end up paying for a similarly spec-ed gaming rig.
- NV6 Server: $1.35/hr
- Bandwidth at 10MBit/s: $0.41/hr
- HD storage: $0.003/hr
Total at 10MBit/s: $1.76/hr
Total at 30Mbit/s: $2.58/hr (recommended tho)
Note: playing via the cloud doesn’t make you suck any less at gaming ;)
Part 1: Creating the Azure instance
- Go to the Azure portal and use the following instructions to create a new NV6 type machine (has NVIDIA’s M60 GPU). The K80 machines won’t work for this since they don’t virtualize the display adapter we need.
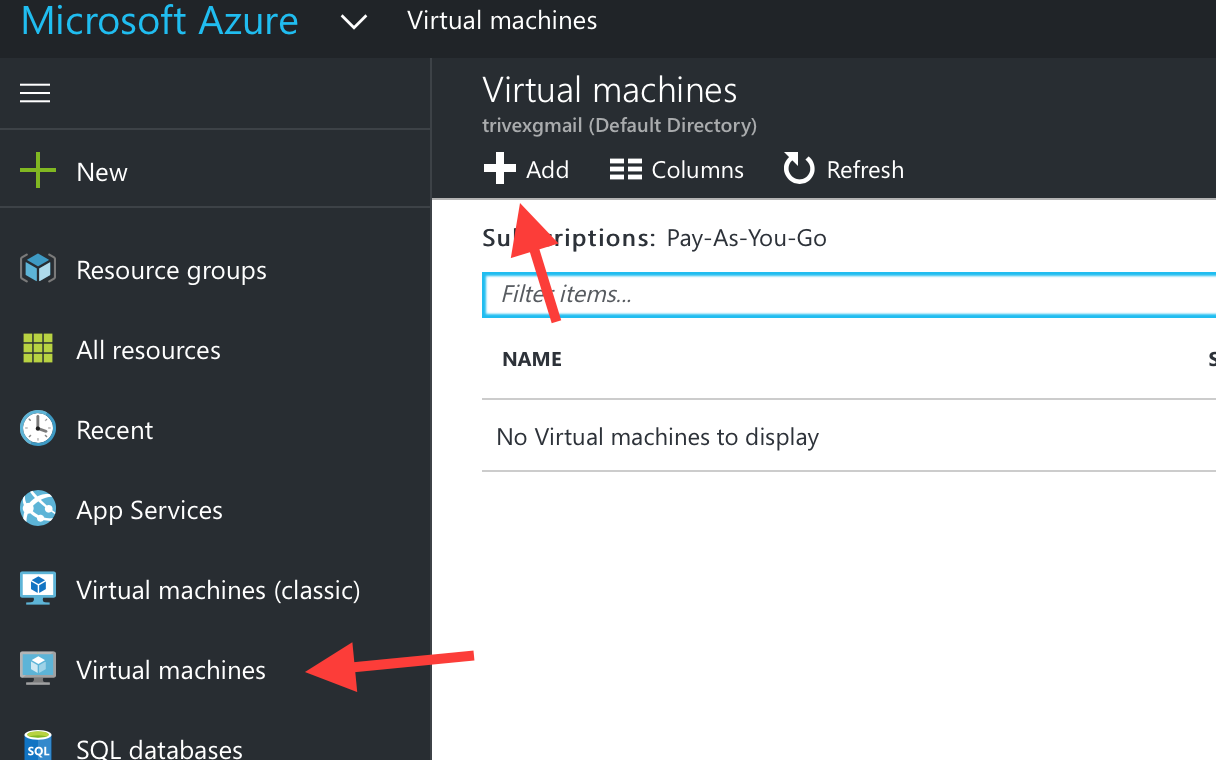
- Enter the Azure Portal
- On the left side select ‘Virtual machines’ and click ‘Add’
- Select ‘Windows Server’ then ‘Windows Server 2016 Datacenter’
- When prompted for the deployment model, select ‘Resource Manager’ from the dropdown and click the ‘Create’ button
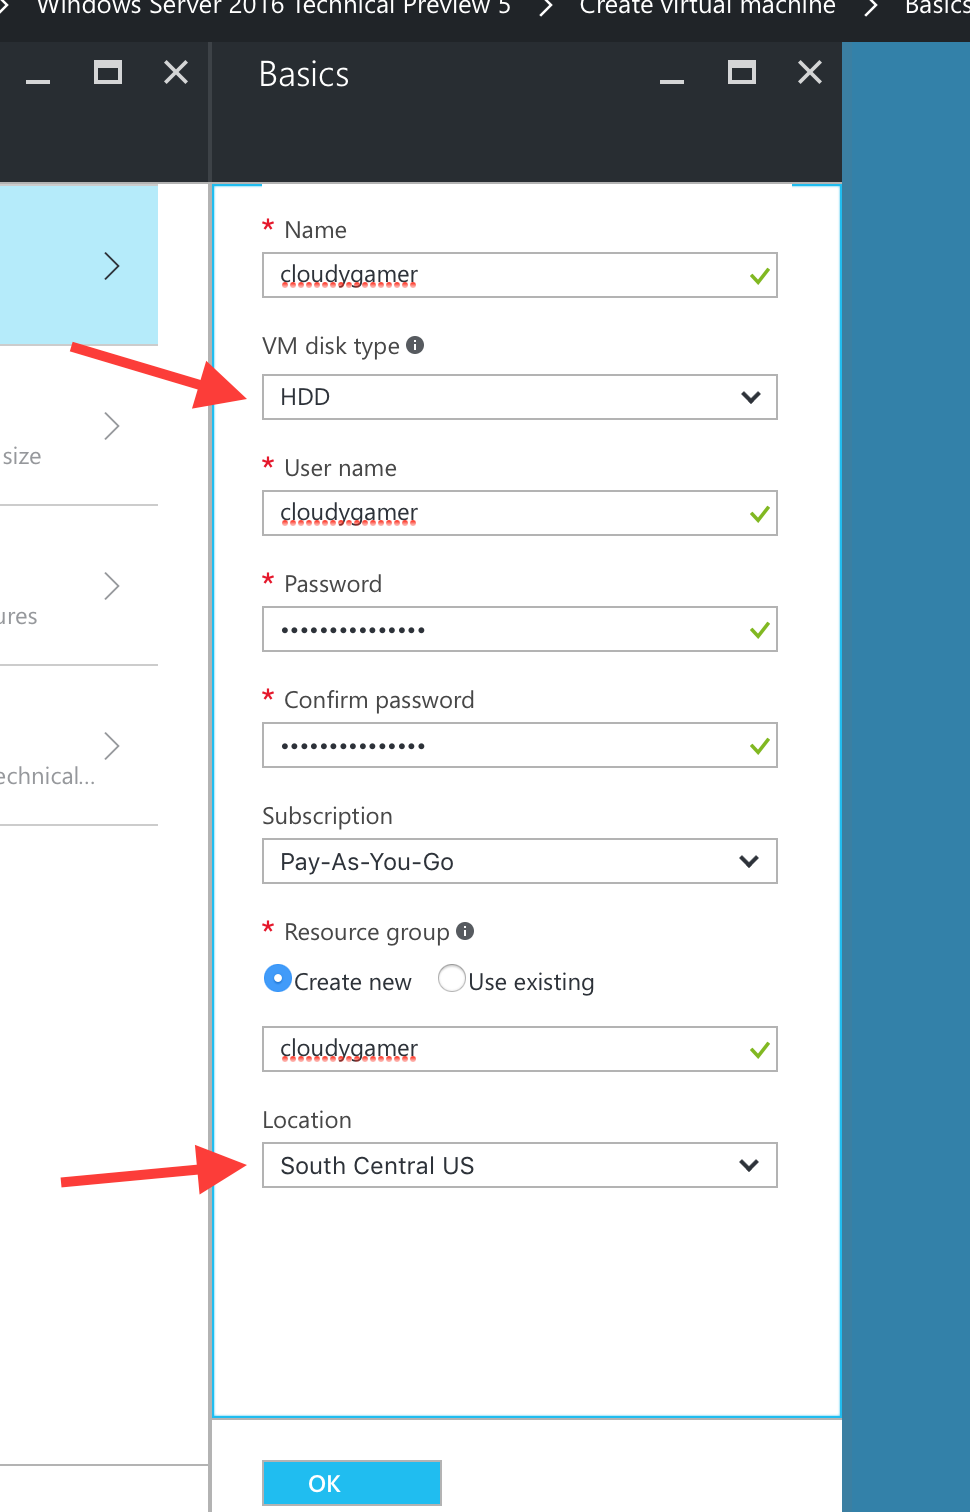
- Enter a name and some credentials for the machine. Make sure though that the ‘VM disk type’ is ‘HDD’ and the Location is ‘South Central US’ (this is the only location they support right now)
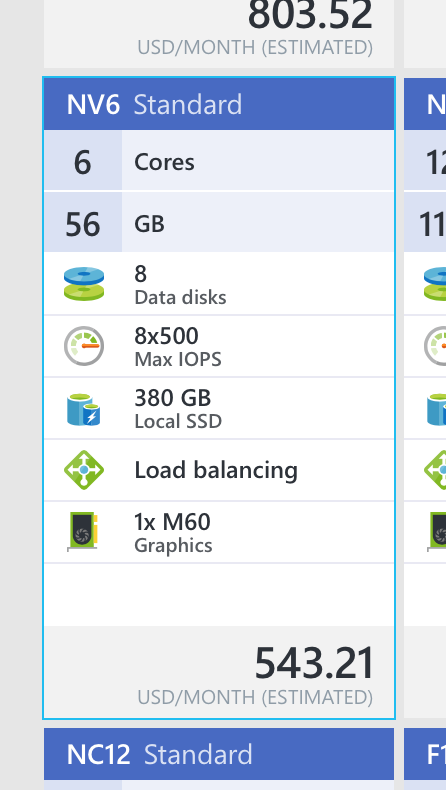
- When prompted to pick the size (type) of machine select ‘View all’ up top and click on the ‘NV6’ machine type. Try not to panic about the cost, we’ll only be using it for a few hours while gaming, not 24/7. :)
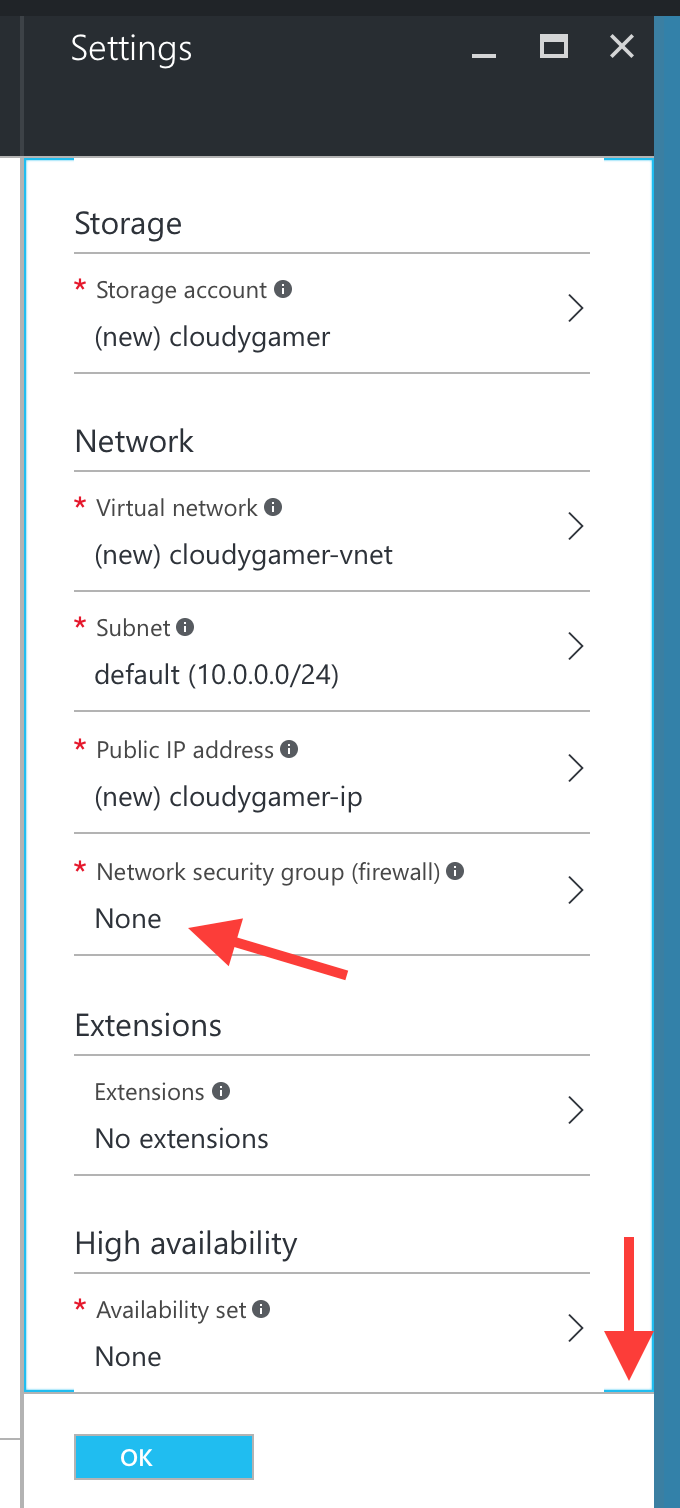
- On the Settings screen, most defaults are fine, but do change the Network Security Group to ‘None’ and turn off Diagnostics
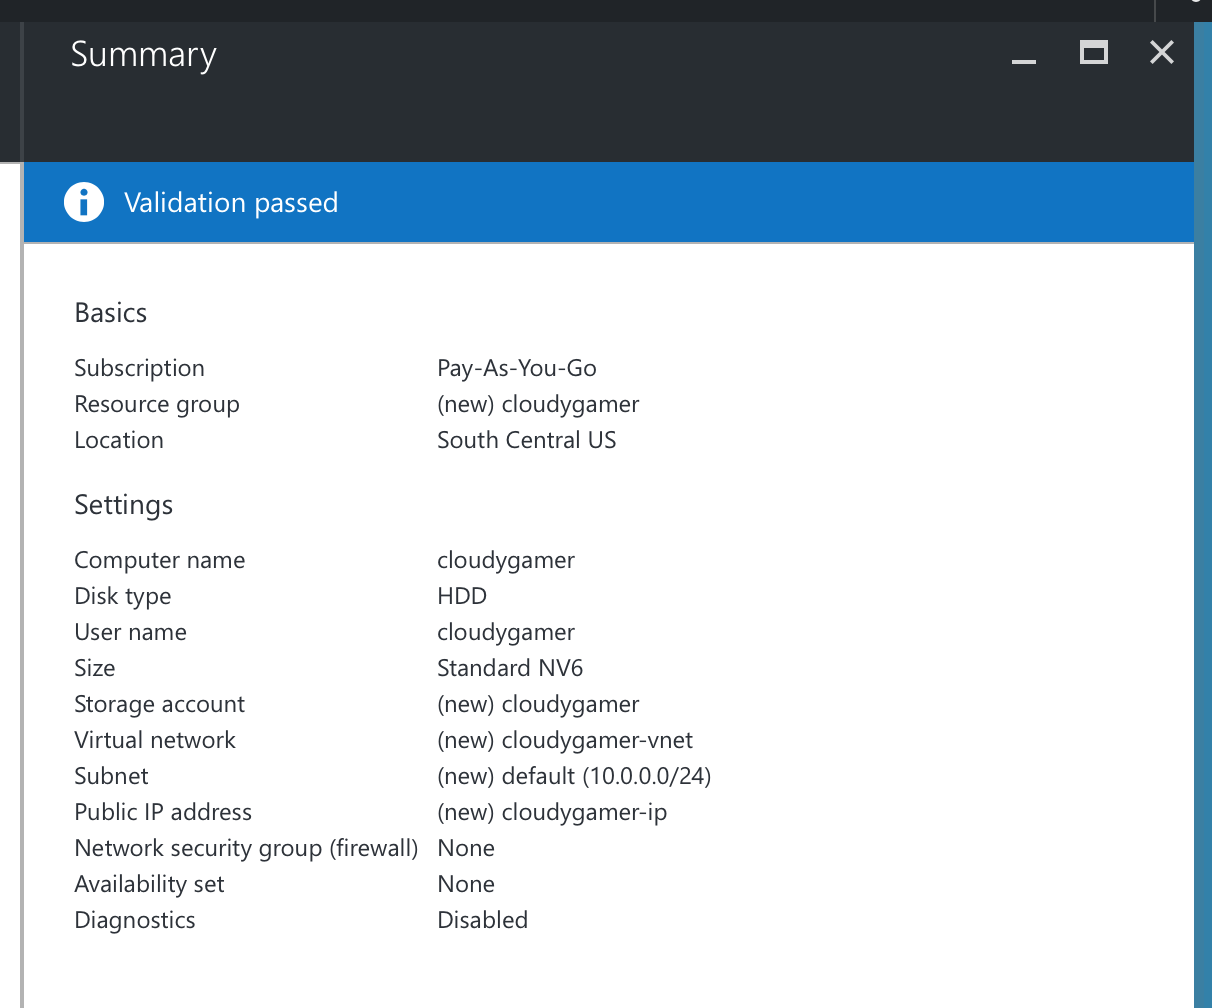
- Confirm everything on the Summary screen and the instance will launch. Note that it takes a few minutes until your machine is Running and it’ll have an IP address.
- Install Microsoft Remote Desktop on your Mac if you haven’t already. Set up the machine with the username/password you specified when creating the instance and the IP address listed on Azure. Additionally:
- Select ‘Connect to admin session’ on the machine’s properties
- Unselect ‘Start session in full screen’
- Select a resolution of 1024x768
- For ‘Sound’ select ‘Don’t play sound’ (it’s unnecessary)
- Once connected, you’ll need to create a new user account that isn’t the account you specified earlier. This is necessary for some driver changes and auto-login steps you’ll be doing later.
- Right click on the Start button and select ‘Control Panel’
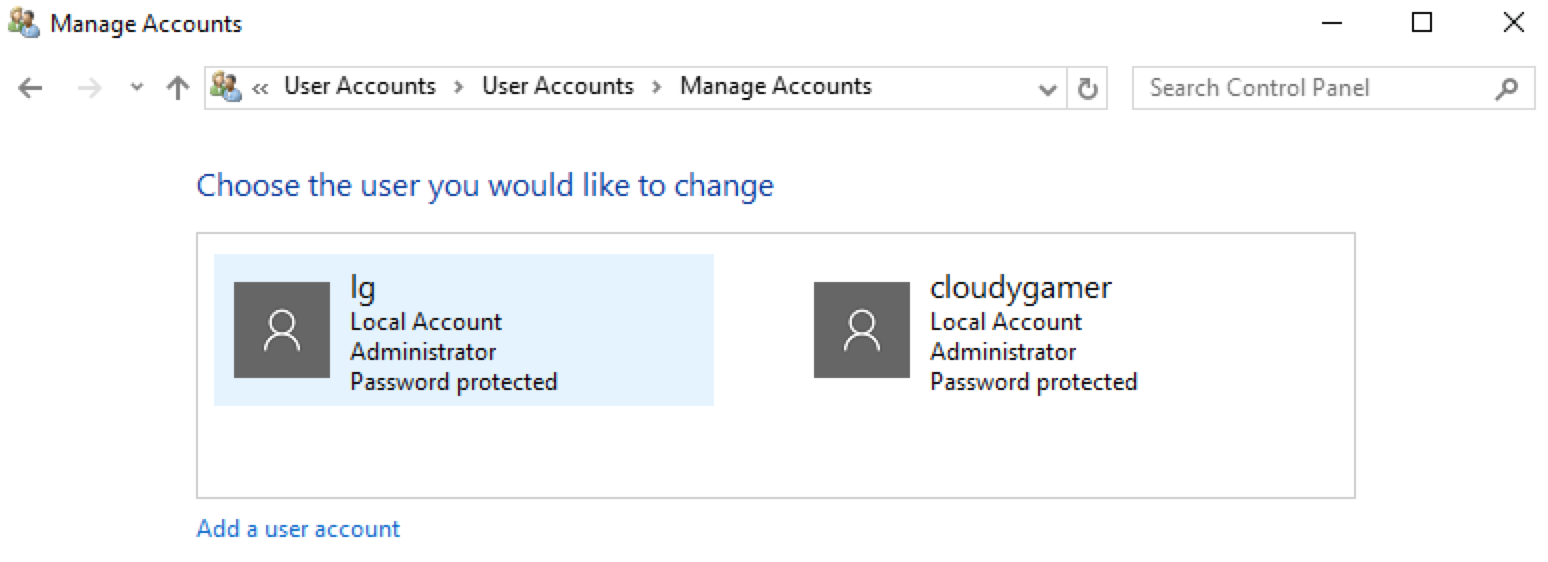
- Then select ‘User Accounts’ and then ‘User Accounts’ again, then ‘Manage another account’
- Then click to ‘Add a user account’ and create a new user. This will be the accout you’ll use going forward.
- Once created, click on it on the list
- Click on ‘Change the account type’, select ‘Administrator’, and confirm
- Close the window and disconnect from the session
- Set up this new user on Microsoft Remote Desktop on the client side and re-login with the new account. You won’t need the old account anymore, so feel free to remove settings about it from Remote Desktop.
Part 2: General configuration for making the server more of a workstation
- Run Windows Update on it
- Click the Start button and select ‘Settings’, then select ‘Update & Security’ and run Windows Update there
- It can take a while for this to complete, and even might appear to be stuck at a certain percentage, but all is ok, just keep waiting
- Once it completes, restart the machine if necessary. It’ll probably take several minutes until the machine will be back up and running.
- Turn on ICMP Ping requests with the Windows Firewall. It’s useful for debugging.
- Click the Start button and type ‘Windows Fire’ and select ‘Windows firewall with Advanced Security’
- Select ‘Inbound rules’ on the left side and enable the rule ‘File and Printer Sharing (Echo Request - ICMPv4-In)’
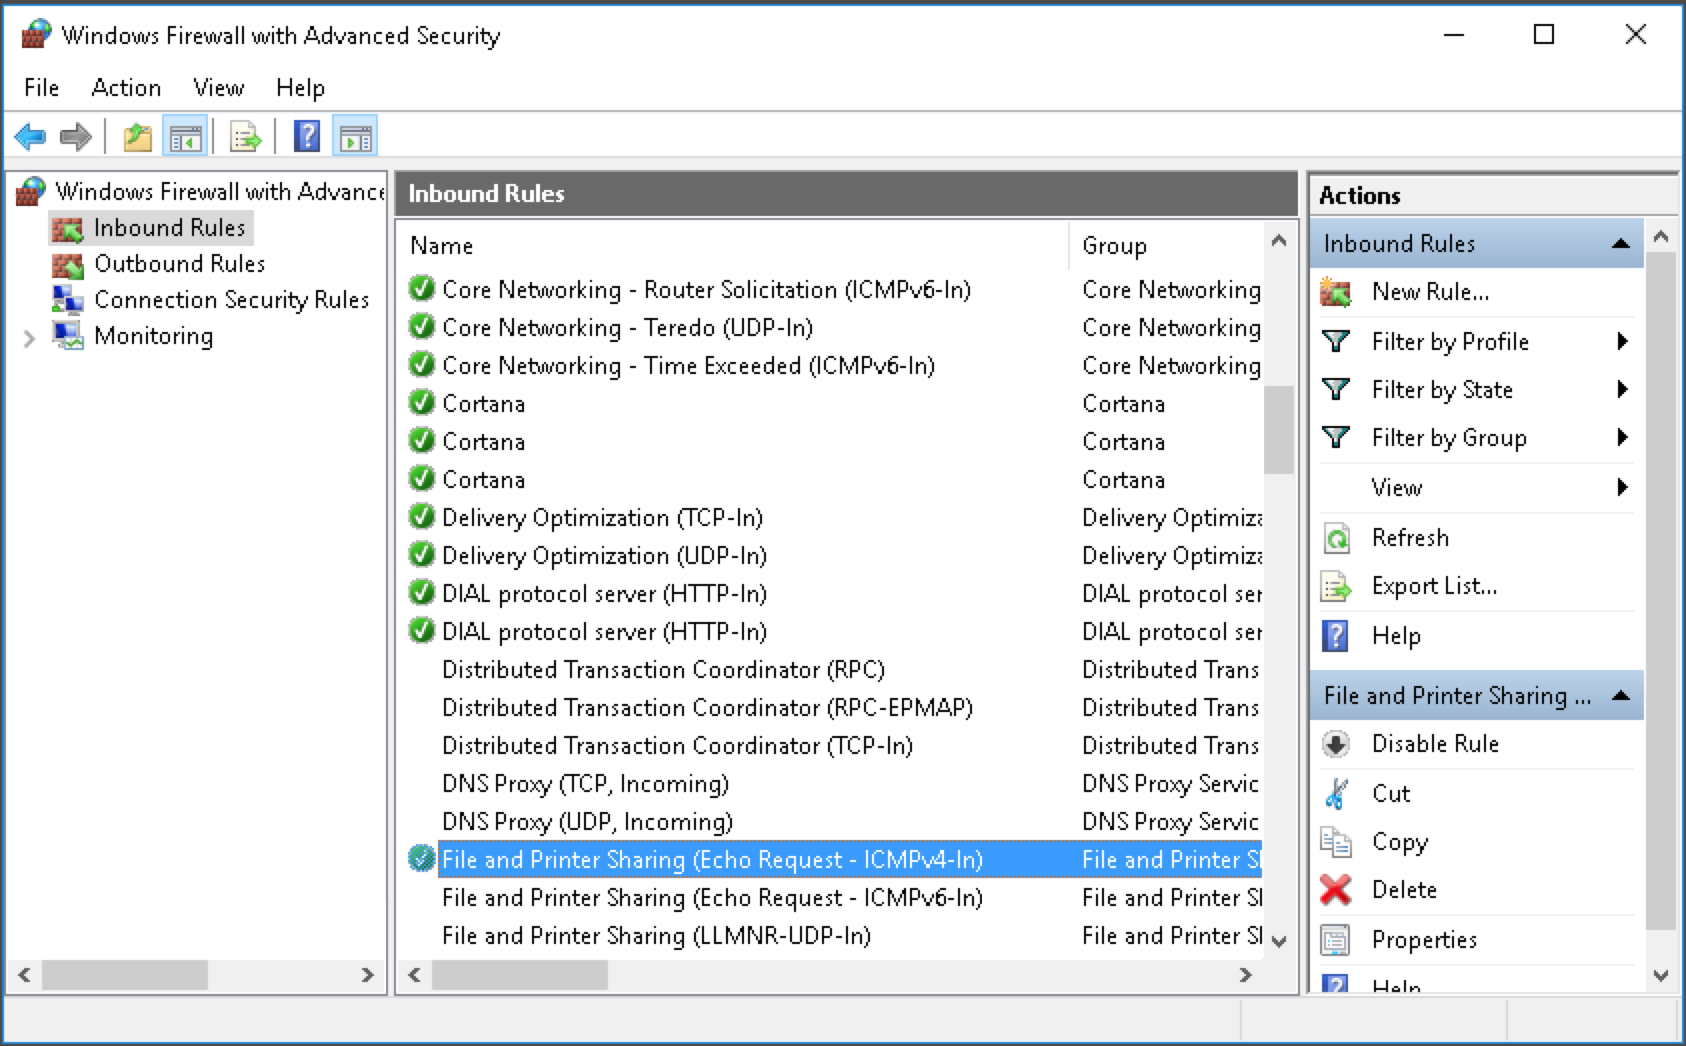
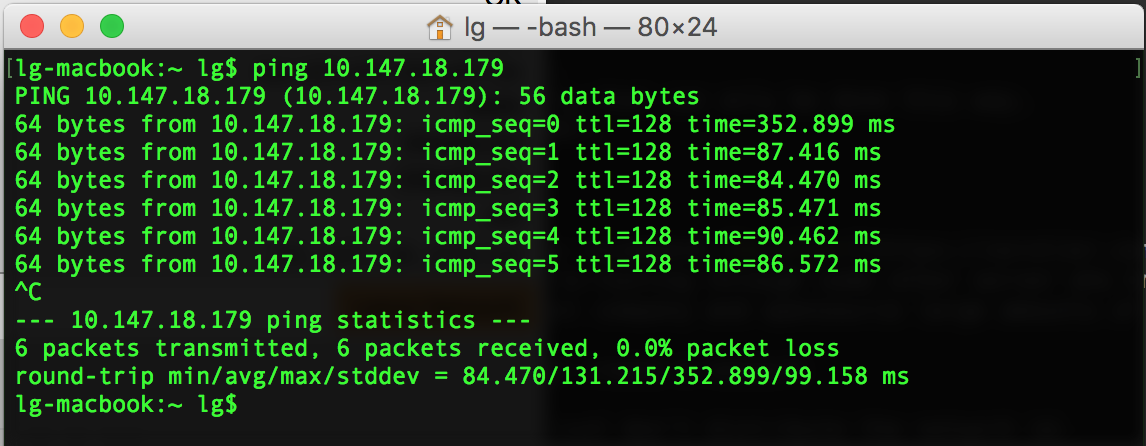
- You should now be able to ping your server machine from your laptop to figure out what the roundtrip time is
- Disable Windows Defender
- Click the Start button and type in ‘Windows Defender’
- Click Settings and turn off ‘Real-time protection’
- Turn off auto Defragmenting drives (yes this is a real problem that’ll happen in the middle of your games)
- Click the start button and type in ‘Defragment’ and select ‘Defragment and Optimize drives’
- Click on ‘Change settings’ for ‘Optimization schedule’
- Uncheck ‘Run on a schedule’
- Turn on performance flags, plus turn off the boot timeout (since we’re on a server)
- Right click the Start button and select ‘System’, then select ‘Advanced system settings’ on the left side
- In the Performance section, click on ‘Settings…’
- In the Visual Effects tab, select ‘Adjust for best performance’
- In the Advanced tab, select ‘Programs’ and click Ok
- Back to the ‘System Properties’ dialog, click the ‘Settings…’ button in the ‘Startup and Recovery’ section
- Uncheck ‘Time to display list of operating systems’ since you never get to see that anyways
- Finally, select ‘(none)’ for the ‘Write debugging information’ dropdown
- Remove unnecessary scheduled tasks
- Right click the start button and select ‘Computer Management’
- Expand ‘Task Scheduler’ on the left side
- Now for each of the following in ‘Task Scheduler Library > Microsoft > Windows’:
- Disable all tasks in ‘Chkdsk’
- Disable all tasks in ‘Diagnosis’
- Disable all tasks in ‘DiskCleanup’
- Disable all tasks in ‘Maintenance’
- Disable all tasks in ‘SystemRestore’
- Disable all tasks in ‘Windows Defender’
- Disable File and Printer sharing and SMB client on the network
- Right click the start menu and select ‘Network Connections’
- Double click on ‘Ethernet’. Try not to be distracted by the alleged ‘40.0 Gbps’ connection the machine has. :)
- Click on Properties and uncheck ‘Client for Microsoft Networks’ and ‘File and Printer Sharing for Microsoft Networks’
- Disable unnecessary services
- Click the Start button and type in ‘Services’
- For each of the following services, double click on it and select ‘Startup Type > Disabled’ and Stop the service
- Server
- Print spooler
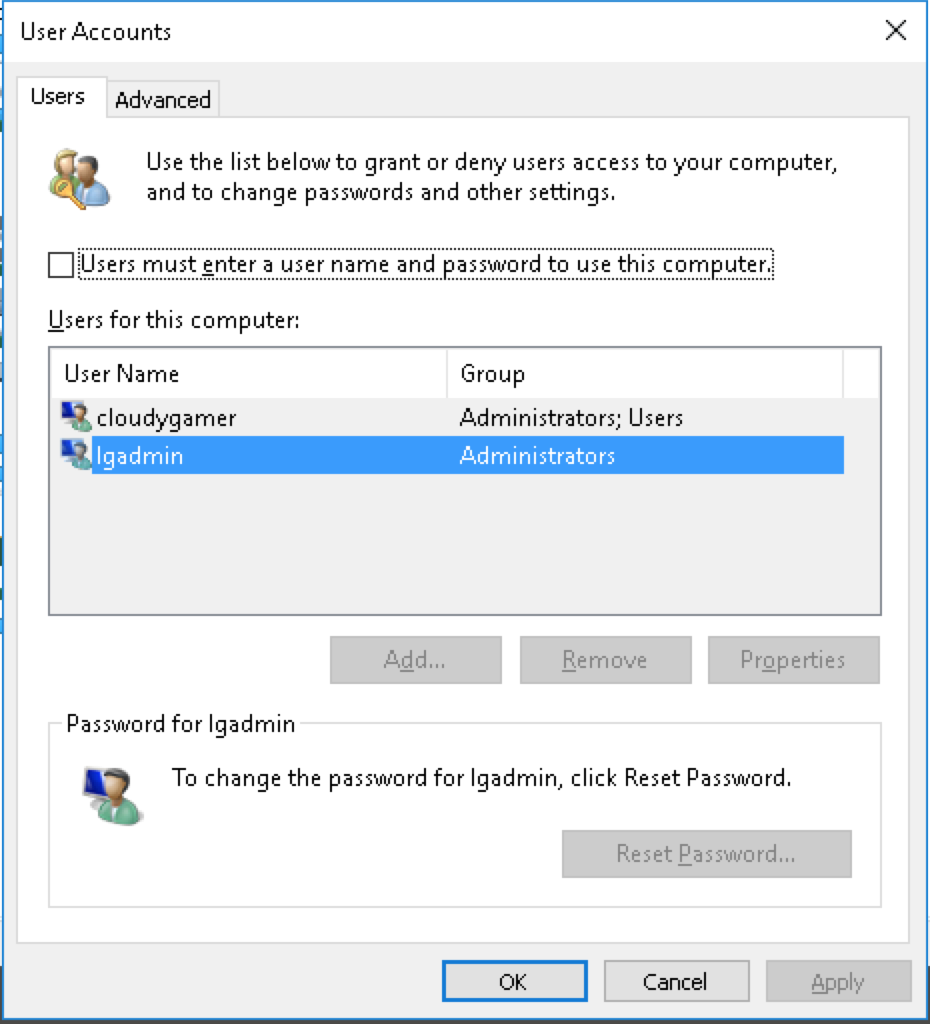
- Turn on auto-login into Windows. This is useful to make it faster to start playing games after rebooting.
- Press the Start button and type in ‘netplwiz’
- Click on your username
- Uncheck ‘Users must enter a user name and password to use this computer’
- Then click the OK button and enter your user’s password
- Enable file extension showing and system/hidden file showing
- Open up the File Explorer and click ‘View’ up top
- Put a check in ‘File name extensions’, geez, how is hiding extensions ok?
Part 2.5: Some nice-to-haves
- Make the desktop background black (or a non-picture) to minorly speed up Remote Desktop sessions
- Right click the desktop and select ‘Personalize’
- For ‘Background’ select ‘Solid color’
- Then pick the black color below (or whatever color your heart desires)
- Turn off notifications of things you already told it you don’t want on
- Right click the Start button, select ‘Control Panel’, click ‘System and Security’, and finally click ‘Security and Maintenance’
- On the left side select ‘Change Security and Maintenance settings’
- Uncheck all the things that make you feel superior to other people and don’t need to be reminded about
- Turn on always showing icons in the system tray
- Right click on the taskbar and select ‘Properties’, then select ‘Notification area’ > ‘Customize…’
- Click on ‘Select which icons appear on the taskbar’
- Turn on ‘Always show all icons in the notification area’
- Turn off combining taskbar icons and some other taskbar cleanups
- Right click on the taskbar and uncheck ‘Show Task View button’ and ‘Show touch keyboard button’
- Right click on the taskbar and select ‘Properties’, then select ‘Taskbar buttons’ > ‘Never combine’
- Fix the time zone because you’re not some crazy sysadmin
- Right click the time in the systray and select ‘Adjust date/time’
- Select ‘Time zone’ to be where you are
- Make the Server Manager not start up every time the computer does
- Open the Server Manager
- Go to the ‘Manage’ menu and select ‘Server Manager Properties’
- Put a check in ‘Do not start Server Manager automatically at logon’
Part 3: NVIDIA M60 video card
-
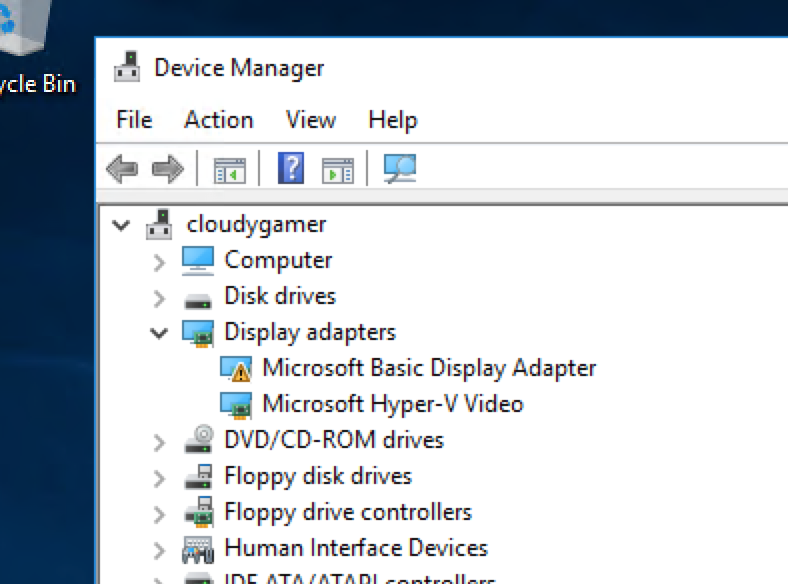
You’ll notice that if you pull up the Device Manager that the driver will be missing for the M60 video card.
-
Get the latest NVIDIA Tesla M60 drivers from here. Sometimes there are other versions of the drivers mentioned on Azure forum, so go there if you have incompatibility problems.
-
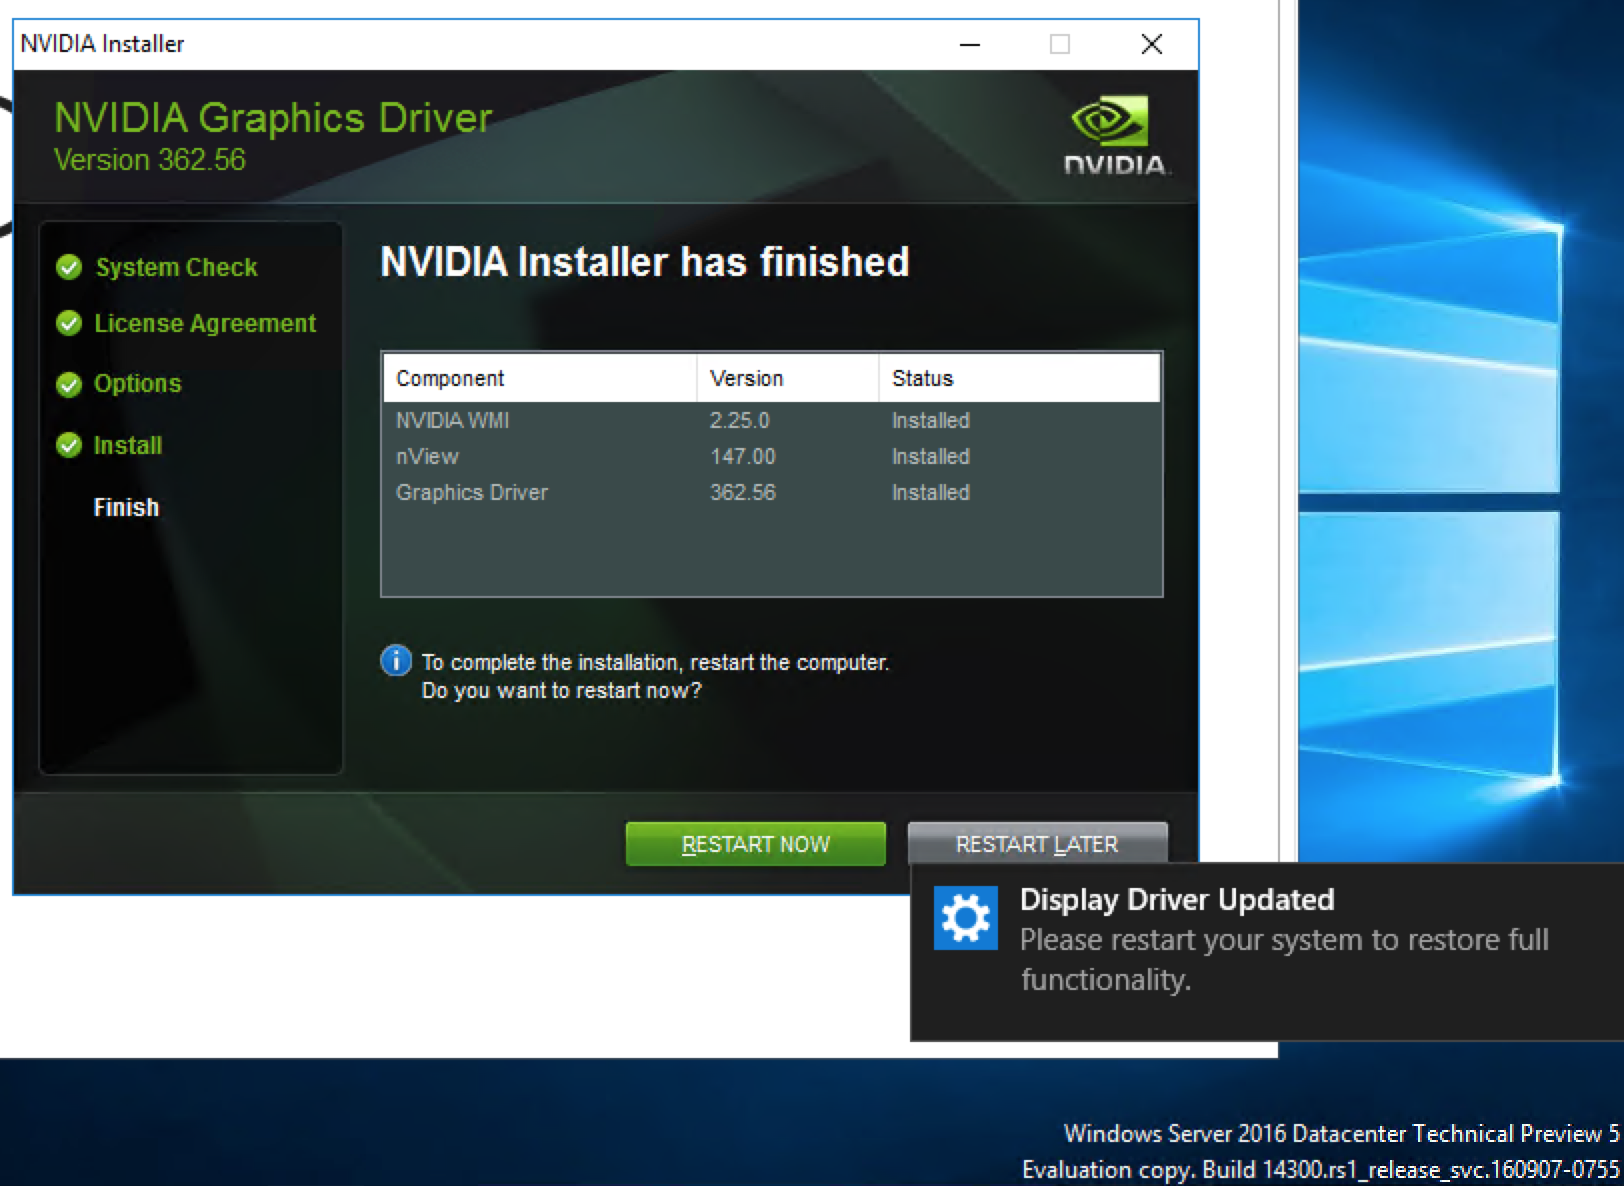
Do the regular Express install and reboot when completed.
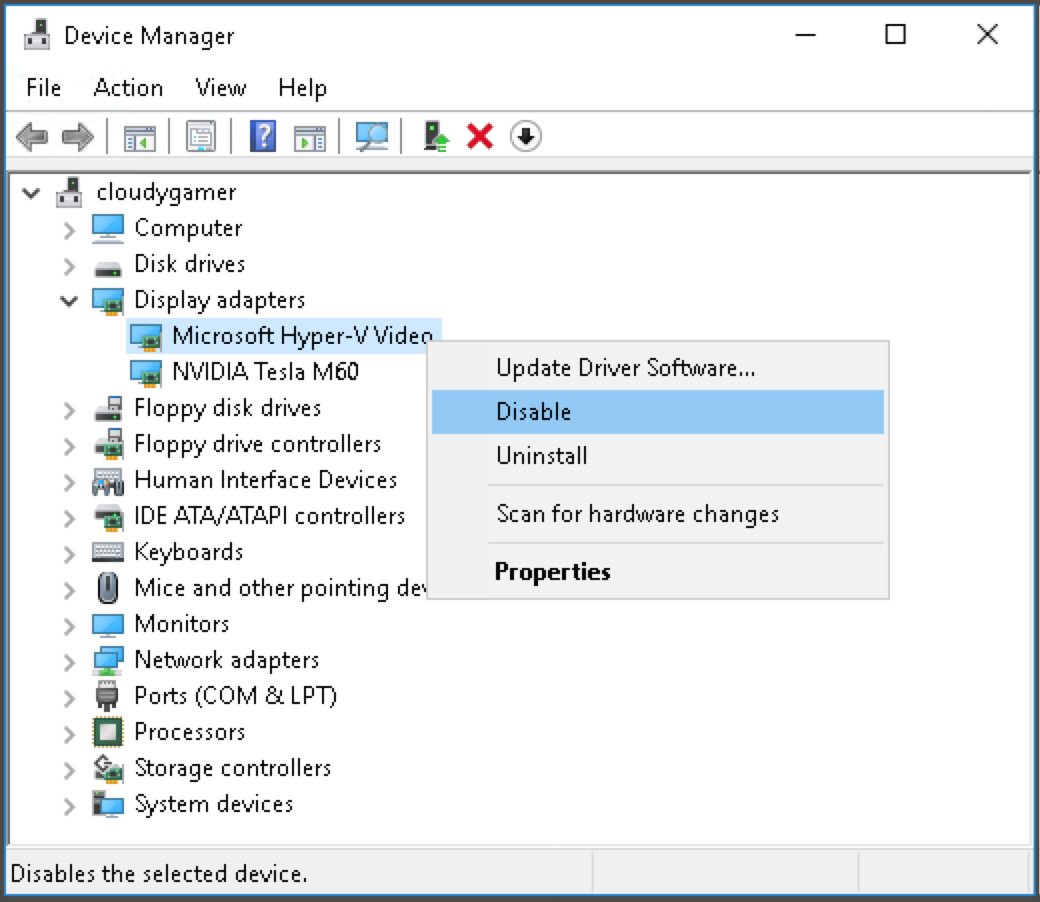
- Disable the default display adapter in Windows or else games will choose the wrong one
- Right click the Start button and select ‘Device Manager’
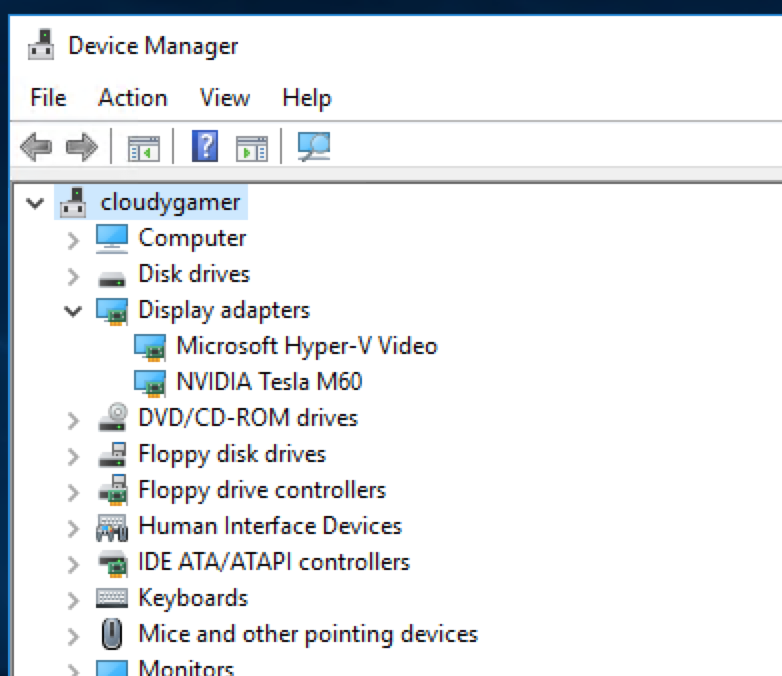
- Expand ‘Display adapters’, right click on ‘Microsoft Hyper-V Video’ and select ‘Disable’. Though notice the fancy M60 card on there now too!
- Right click the Start button and select ‘Device Manager’
- You’re using the Remote Desktop service in Windows to administer everything. The problem is that whenever you disconnect from the server, Remote Desktop will lock the screen (and you’ll need to CTRL-ALT-DEL to be able to use things). This is no good if we’ll want games to be running.
- On the desktop, right click and create a new shortcut and have it run the command
tscon 1 /dest:consoleand name it ‘Disconnect’. NOTE: sometimestscon 1isn’t the correct one, trytscon 2. you’ll know that it works if you get disconnected when running this after the remaining steps below.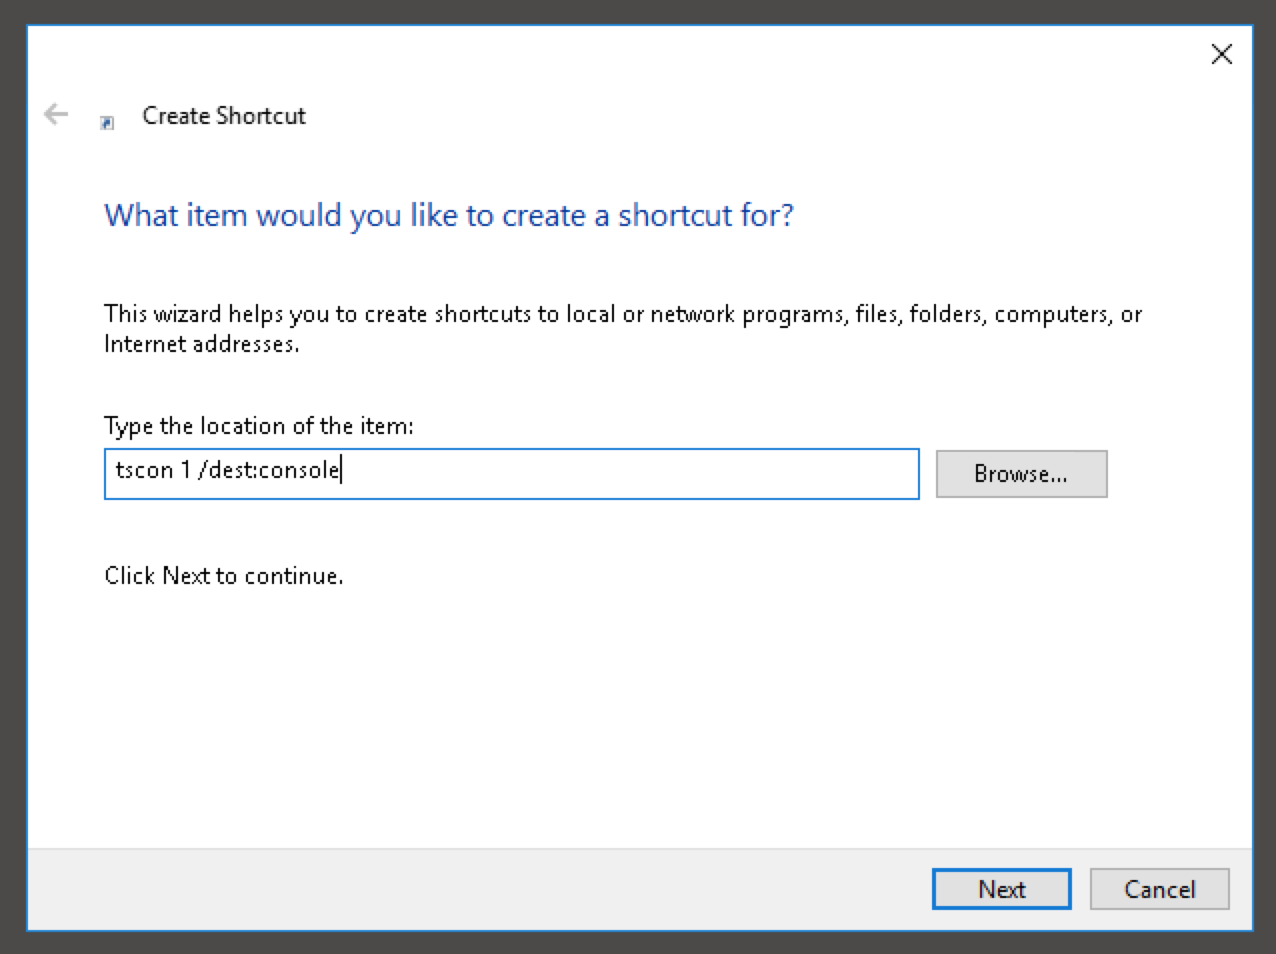
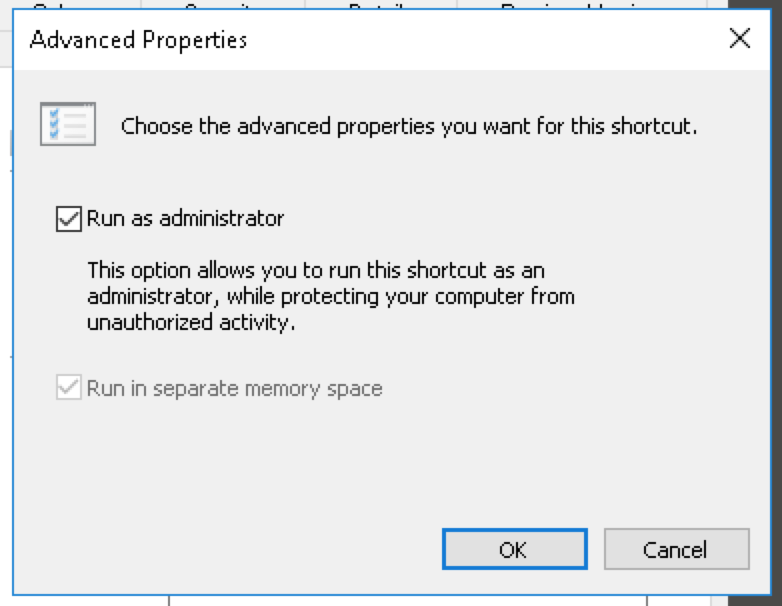
- Right click on it, select Properties and click the ‘Advanced’ button
- Put a checkmark in the ‘Run as administrator’ option
- In the next step and going forward, we’ll be using this link when needing to log out of Remote Desktop but keep the unlocked desktop available for other applications
- On the desktop, right click and create a new shortcut and have it run the command
- As this video card introduces possibility of another monitor being attached to the server, some games will get confused which one to use. Follow the instructions on this post (thanks /r/openstack!) to disable all monitors but the NVIDIA one.
Part 3: Audio
- Enable audio in Windows Server (the service is off by default)
- Click the Start button and type in ‘Services’
- Double click on ‘Windows Audio’ and select ‘Automatic’ for ‘Startup type’
- There is no soundcard on the VM. A free product, VB-CABLE handles this quite well.
- Download it from here
- Extract the zip and run the ‘VBCABLE_Setup_x64.exe’ installer as Administrator
- After installing it, Windows will still say there’s no installed audio device, but don’t worry, Steam will pick it up. You can also see it in the Device Manager.
Part 4: ZeroTier VPN
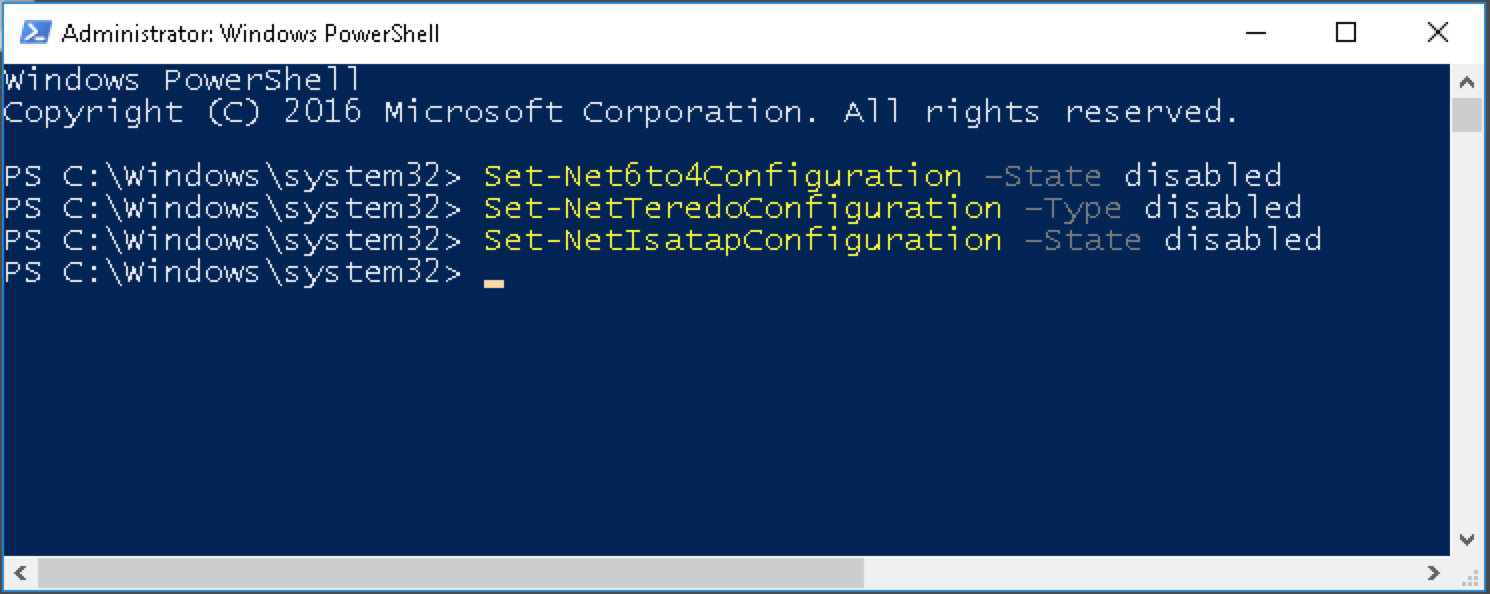
- Azure (like EC2 and others) is still very fresh with IPv6, and it’s current implementation is not enough for use here. We’ll need to force disable it in Windows otherwise some software might try to do a IPv6-over-IPv4 tunnel which ruins everything (Zerotier for examples tries to do this).
- Open up an Administrator PowerShell (click Start, right click on ‘Windows PowerShell’ and ‘Run as Administrator’)
-
Then run the following:
  Set-Net6to4Configuration -State disabled
  Set-NetTeredoConfiguration -Type disabled
  Set-NetIsatapConfiguration -State disabled
- For Steam In-Home Streaming to work properly, you’ll need to set up a VPN. I strongly recommend ZeroTier for this since it’s the best at ensuring a peer-to-peer connection between the machines and not re-routing through some other server who knows where. Oh and don’t worry, for what you’ll be using it for, it’s free. They’re also a super ethical company and opensource large amounts of their core software.
- So, go to Zerotier’s website and create an account there and create a network
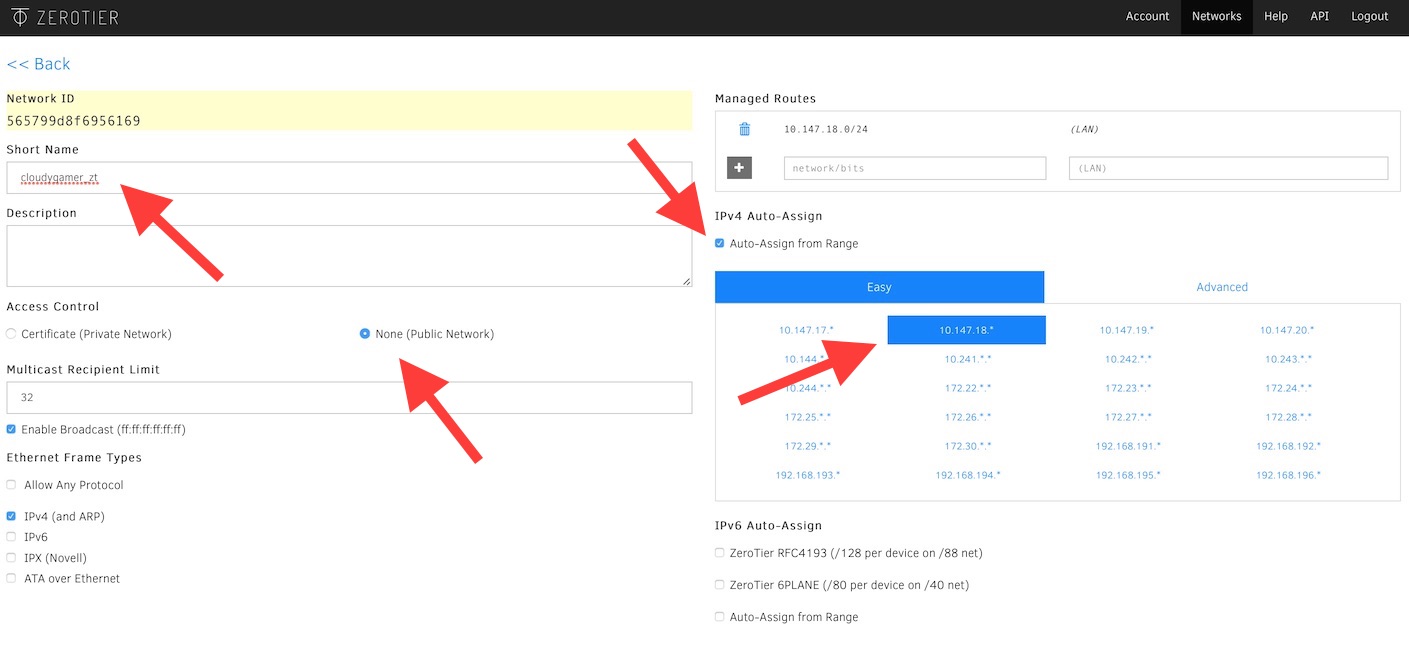
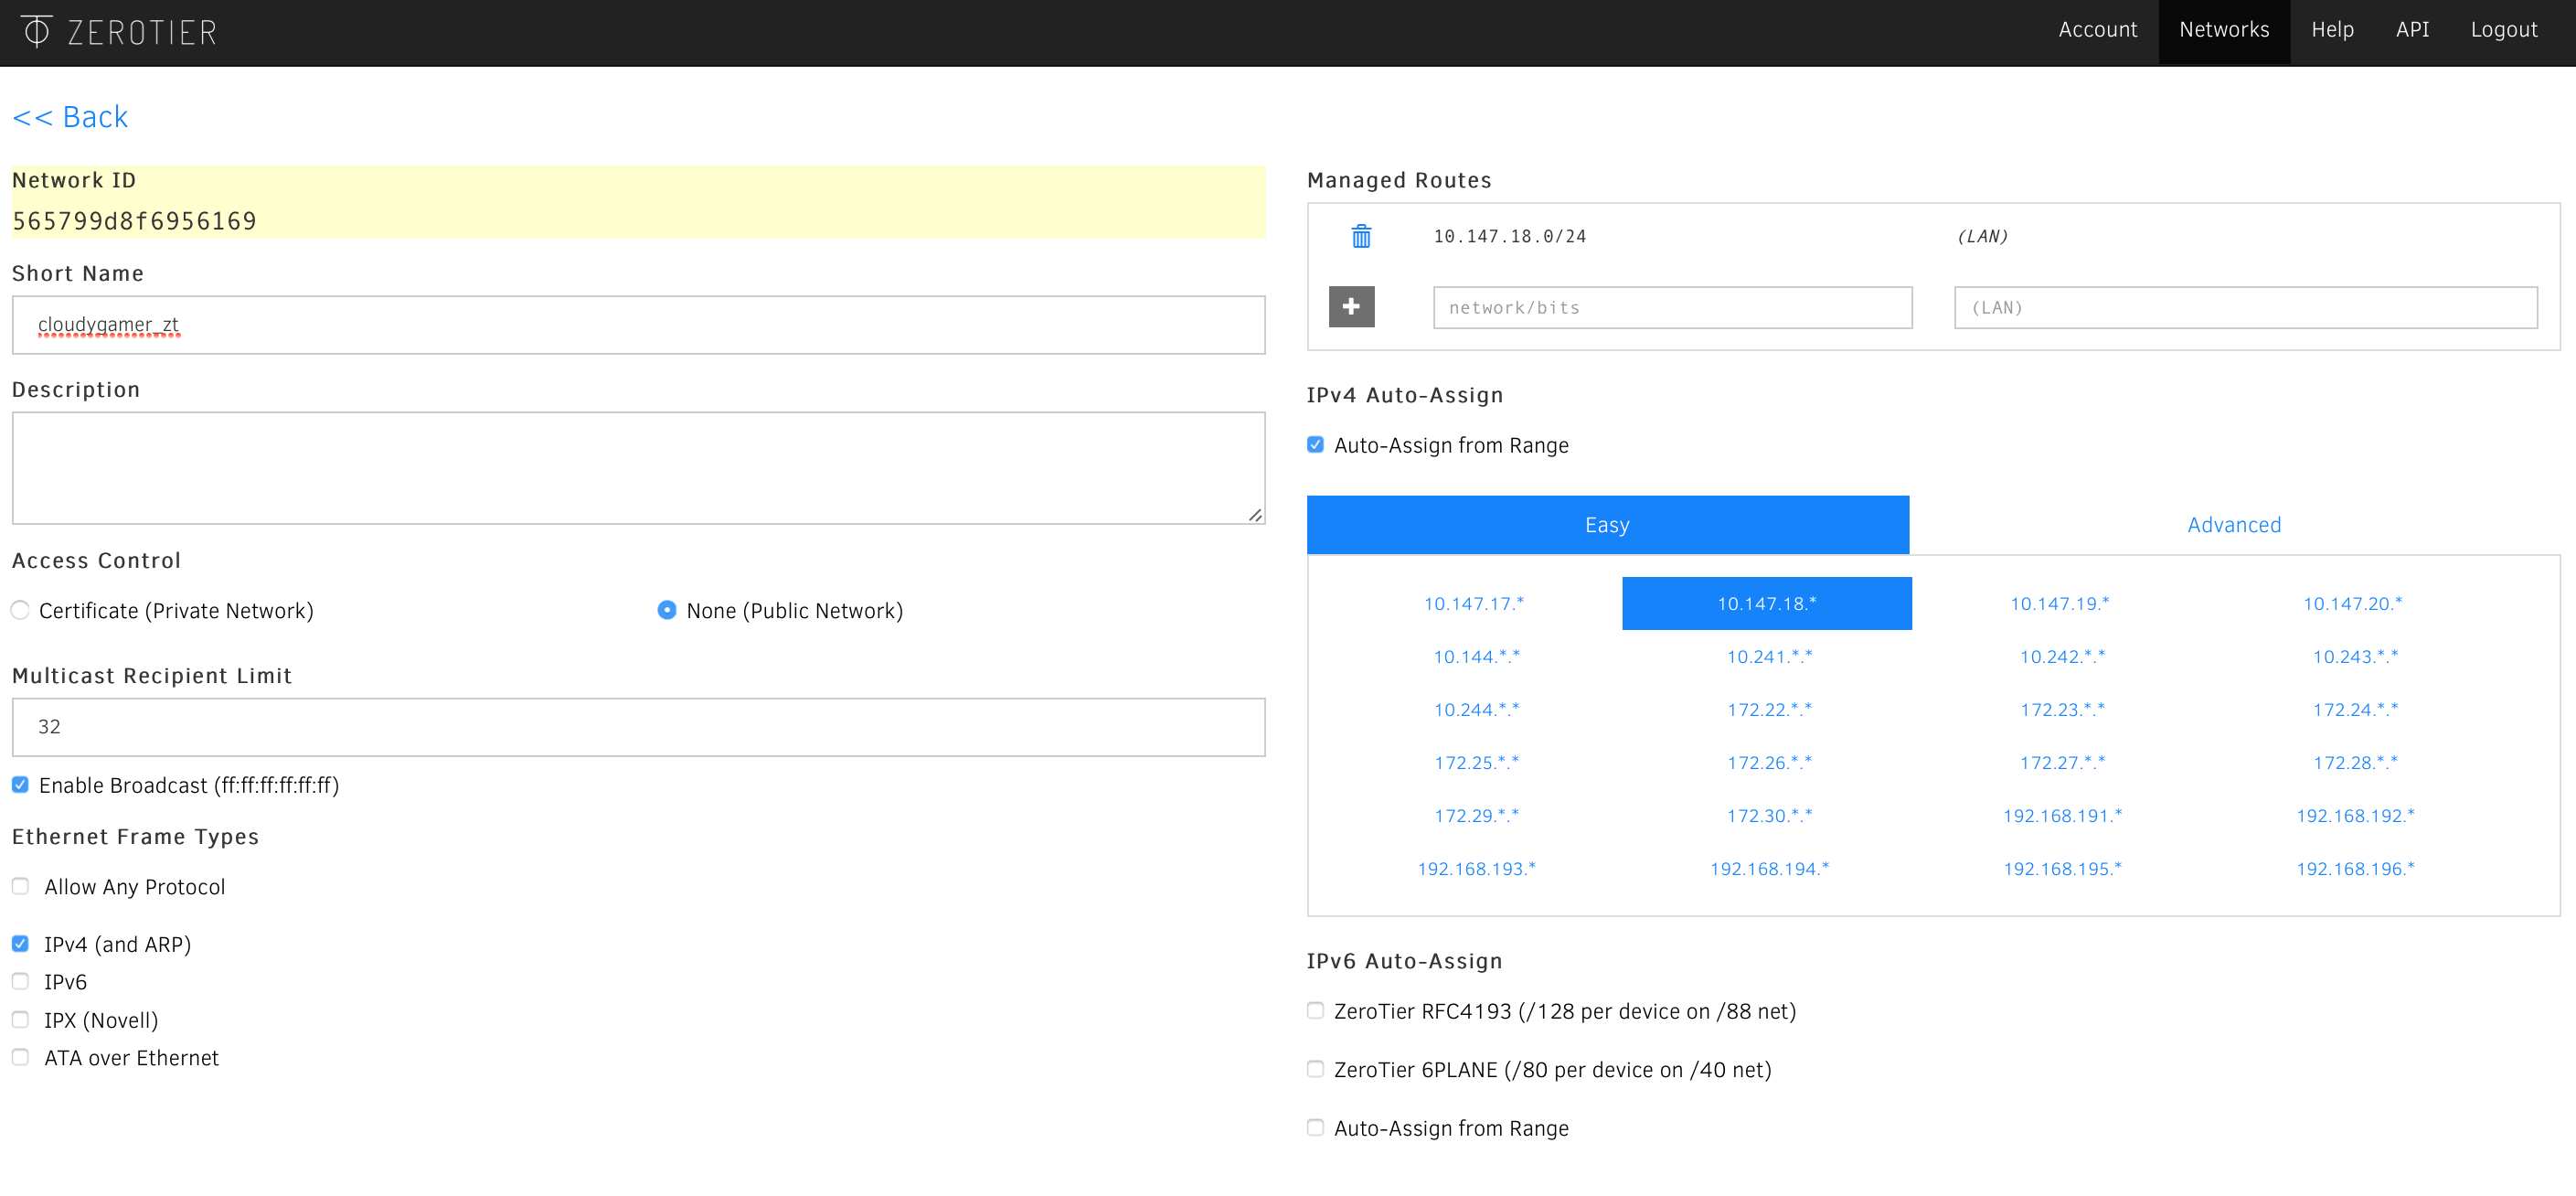
- When configuring the network, there are a few settings necessary:
- I’d recommend setting ‘Access Control’ to ‘None’. It makes configuration easier, just don’t distribute the network id.
- For ‘IPv4 Auto-Assign’ select to ‘Auto-Assign from Range’ and pick an IP range for the VPN. You’ll notice the Managed Routes above will be updated.
- For ‘Ethernet Frame Types’ unselect IPv6, it’s unnecessary since Steam does not support it right now. Make sure IPv4 is on though.
- Write down that Network ID
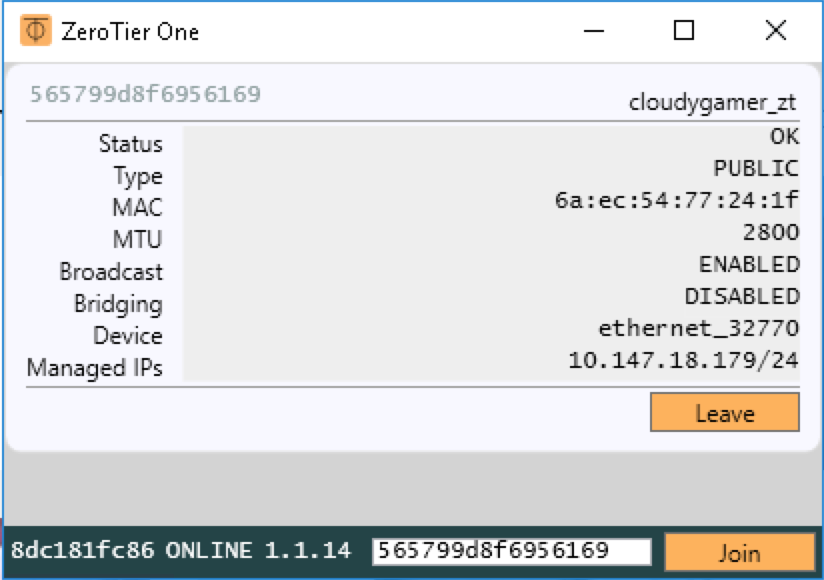
- Now, go install ZeroTier on the server. The Windows download link is here. When installing, select to approve everything, including the network adapter.
- At the end, it’ll come up with the ZeroTier One window. Put your Network ID at the bottom and click Join. Click Yes on any Windows prompts.
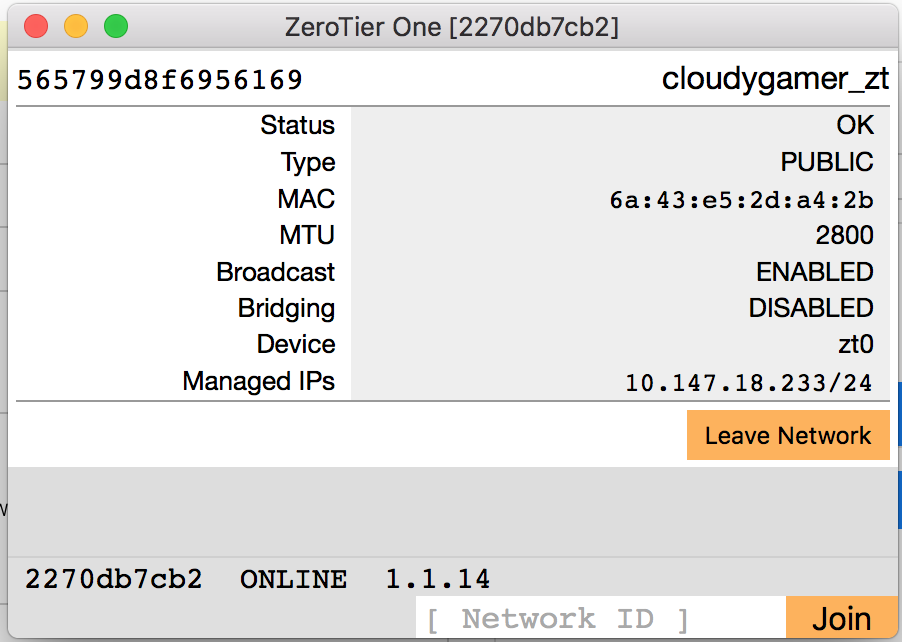
- Repeat the same installation of ZeroTier again except on your laptop. The Mac download link is here. Have it join the same network.
- On the ZeroTier website under your network, you should now be able to see the IP addresses of the two machines.
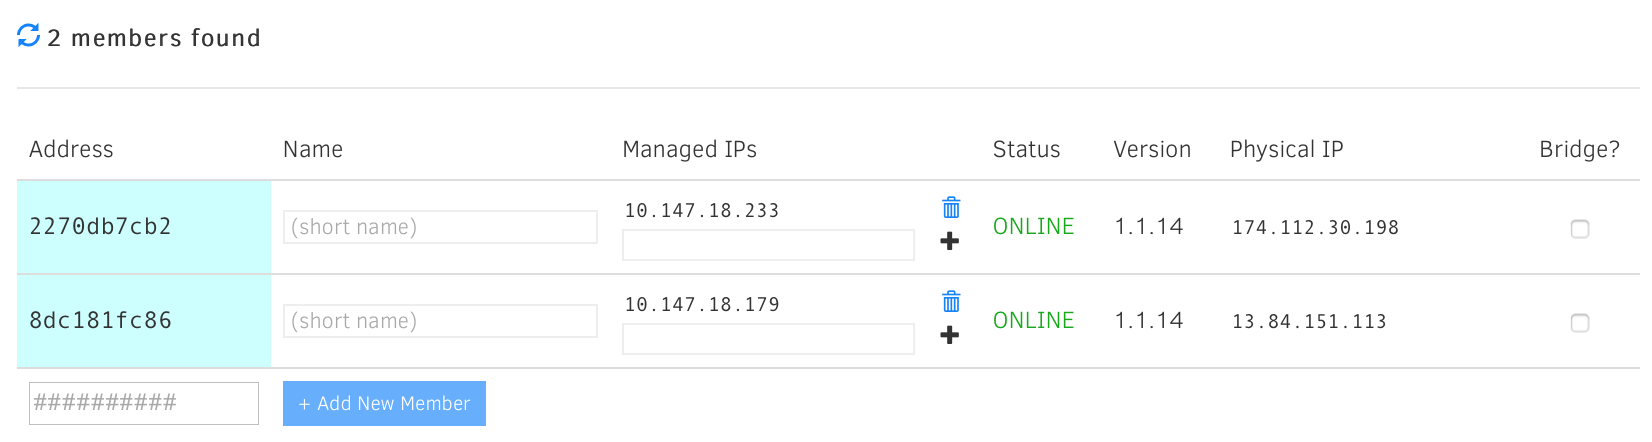
- To test the tunnel works, have one ping the other by its ‘Managed IP’. The ping times should be around the same as if you pinged the Physical IP of the other machine. Ideally your ping times are way lower than the ones in this screenshot… I’m looking forward to when the Azure GPU machines are closer to where I live!
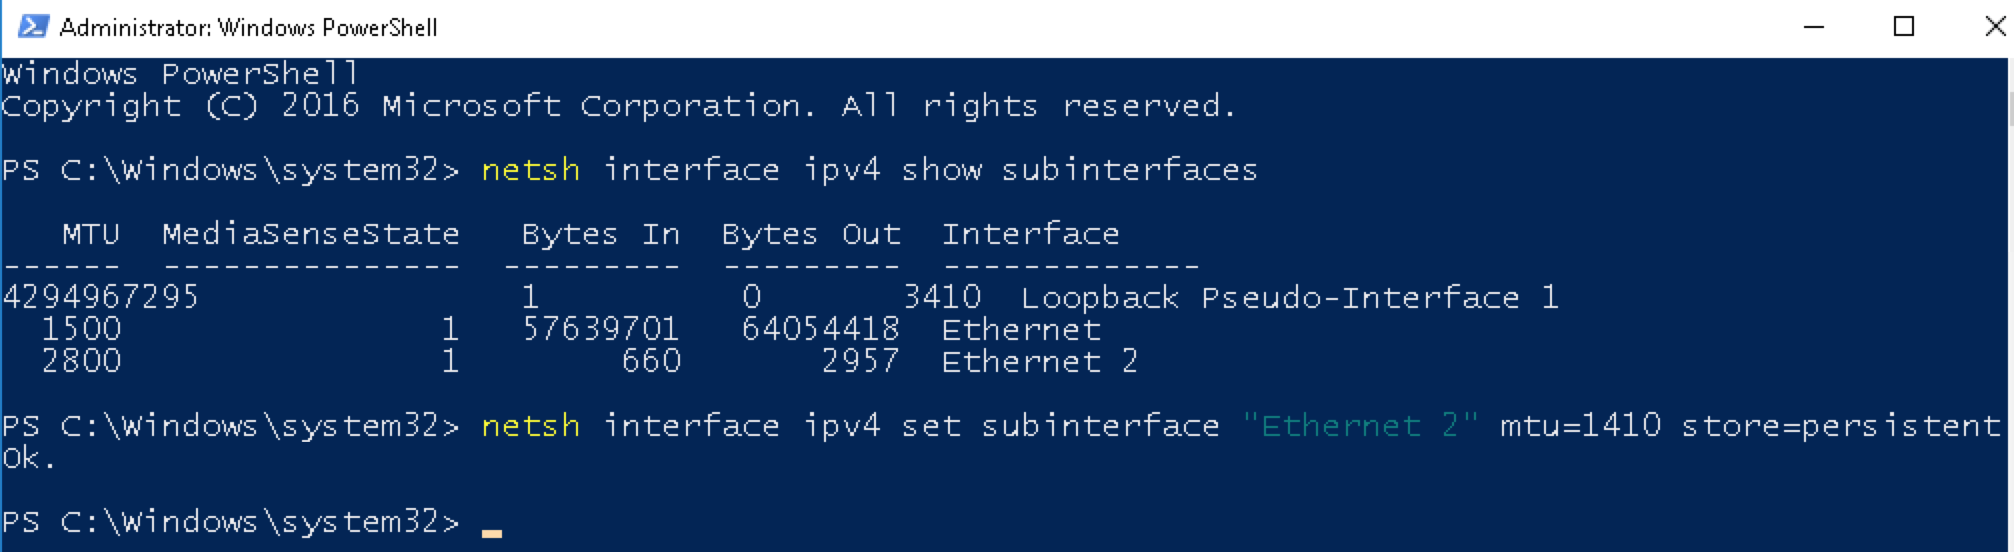
- To optimize the network traffic and packet sizes Steam In-Home Streaming uses you might need to adjust MTU on the server-side. I figured out this number by trial and error and using WireShark on the client side to see when what is supposed to be one streaming packet ended up with one big packet and one tiny one.
-
Open up an Administrator PowerShell and run the following on the server. ‘Ethernet 2’ here is the name of the ZeroTier adapter.
  netsh interface ipv4 show subinterfaces
  netsh interface ipv4 set subinterface "Ethernet 2" mtu=1410 store=persistent
-
- I’d recommend rebooting now, just because of all the quirky network changes. Note that ZeroTier will always reconnect on both systems, so if you ever need to make changes, use ZeroTier One on both systems to configure network changes.
Part 5: Steam In-Home Streaming + OverWatch
- Install Steam (yes, even though we eventually want to play Overwatch, we need Steam’s In-Home Streaming to work)
- Click on the Internet Explorer button on the task bar and go to ‘https://steampowered.com’ and download and install it from there
- Configure the server Steam to:
- Save your password and auto-login (if you have Steam Guard on, you’ll need to put in the code they email you)
- Account > Beta participation, and select ‘Steam Beta Update’. Then restart Steam.
- Friends > Automatically sign into Friends when I start Steam
- In-Game > In-game FPS counter > Top-left (optional, but I like it since this is the raw FPS on the machine)
- In-Home Streaming > Enable streaming
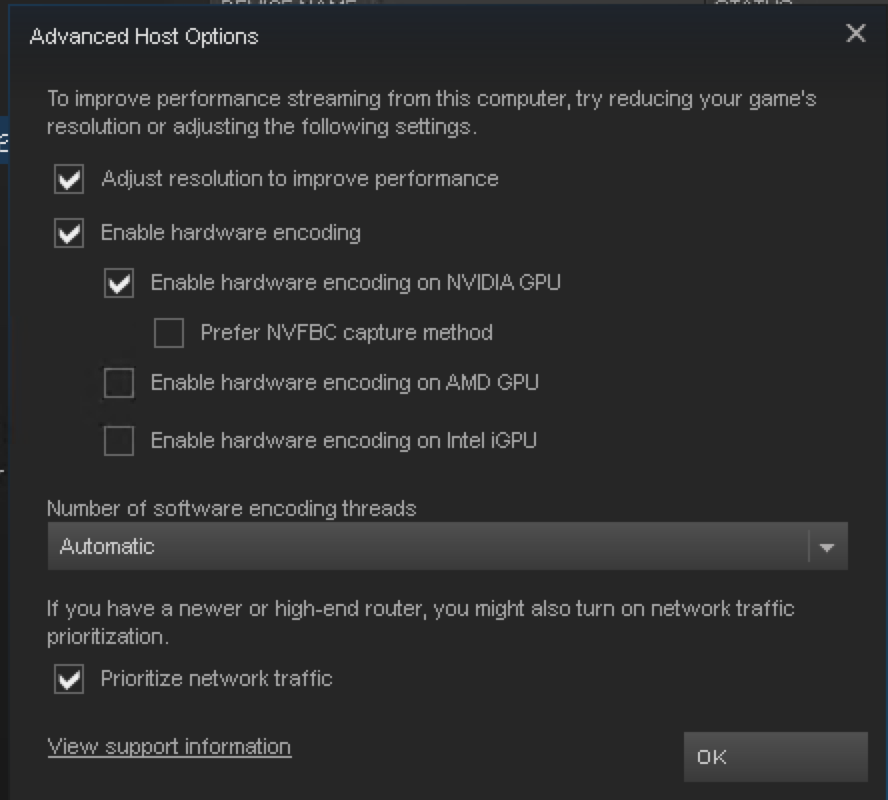
- In-Home Streaming > Advanced Host Options, and Check only the following:
- ‘Adjust resolution to improve performance’
- ‘Enable hardware encoding’
- ‘Enable hardware encoding on NVIDIA GPU’
- ‘Prioritize network traffic’
- Note that everything else should be unchecked. I’ve messed with NvFBC, but what Steam does for full-screen capture seems to be superior (most of the time). Of course, you can mess with it later if you’re trying to debug a game. If you try to use NvFBC, please see my previous EC2 Gaming article for instructions on how to get that set up (you need to run NVFBCEnable).
- Interface > Favorite window > Library
- Interface > Notify me about additions or changes […], uncheck it
- Now lets install Overwatch:
- Download and install Blizzard’s upsell-galore Desktop App for Battle.net launcher thingy
- Log into it with your Battle.net account
- Select Overwatch on the left side and install it
- Now wait until it finishes downloading/installing (takes a few minutes, but surprisingly fast!)
-
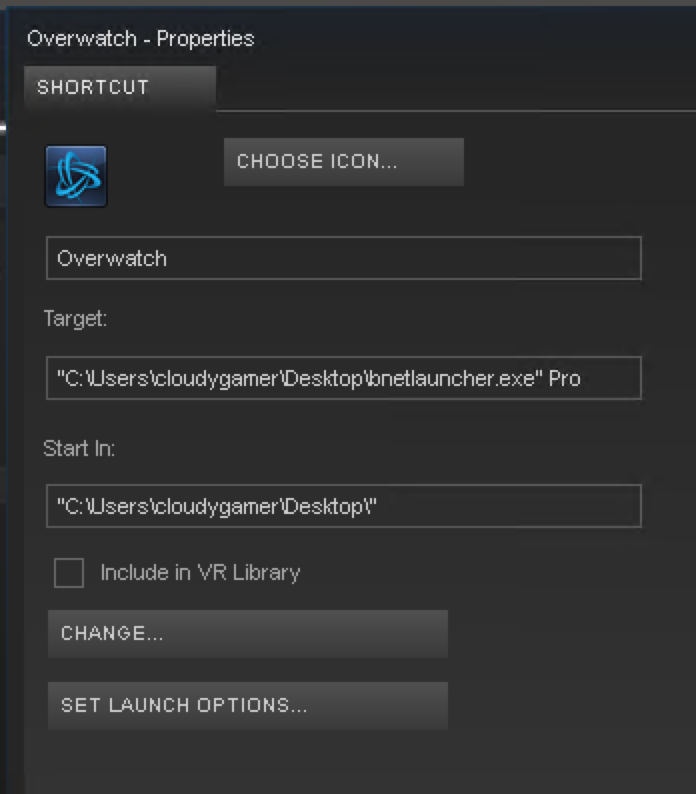
Overwatch in particular has some issues quitting properly after being launched from Steam. Fortunately a tool, bnetlauncher was built to help properly start/stop the game. Basically, keep the official Battle.net client running, but in the next step use this launcher. Feel free to put it anywhere, including on your Desktop.
- To stream games we use Steam’s In-Home Streaming functionality since it’s the most mature game-streaming tech out there (that I’m aware of). The good news is that you can add non-Steam games (like Overwatch/bnetlauncher) and it works great too.
- In Steam, click ‘Add A Game…’ (in the bottom left corner of the window) and select ‘Add a Non-Steam Game…’
- Overwatch should be on the list, but don’t add it that way. Instead, use the ‘Browse…’ button and then select the ‘bnetlauncher’ app from the previous step. Then click the ‘Add Selected Programs’ button.
- After its added, in the Games Library, right click on ‘bnetlauncher’ and select Properties. Set the name to be ‘Overwatch’
- As part of the Target, add ‘ Pro’ after the double-quotes
- On your computer (in Steam), configure it as such:
- In-Home Streaming > Enable streaming
- In-Home Streaming > Client options > Beautiful
- In-Home Streaming > Client options > Advanced client options > Limit bandwidth to > 30 Mbits/s (do NOT set unlimited, it does not work)
- In-Home Streaming > Client options > Advanced client options > Limit resolution to > Display resolution
- In-Home Streaming > Client options > Advanced client options > Enable hardware decoding
- In-Home Streaming > Client options > Advanced client options > Display performance information

Part 6: Let’s play!
- Make sure the Steam client is running on your laptop
- On ther server, fully exit Steam and re-open it. After a few seconds, you should see the In-Home Streaming popup saying the two machines see eachother.
- Use the ‘Disconnect’ shortcut from earlier to close Remote Desktop
- On the Steam client, click the Play button and hopefully the game will load!
- In Overwatch, go to Options, and set the graphics quality to Epic, hit the Apply button and restart the game.
- Happy gaming!!
- Don’t forget to Stop the Azure instance when you’re done playing. It’ll be very expensive if you don’t. You can stop the VM without losing your config. If you want to delete everything, make sure to delete the Resource Group in Azure
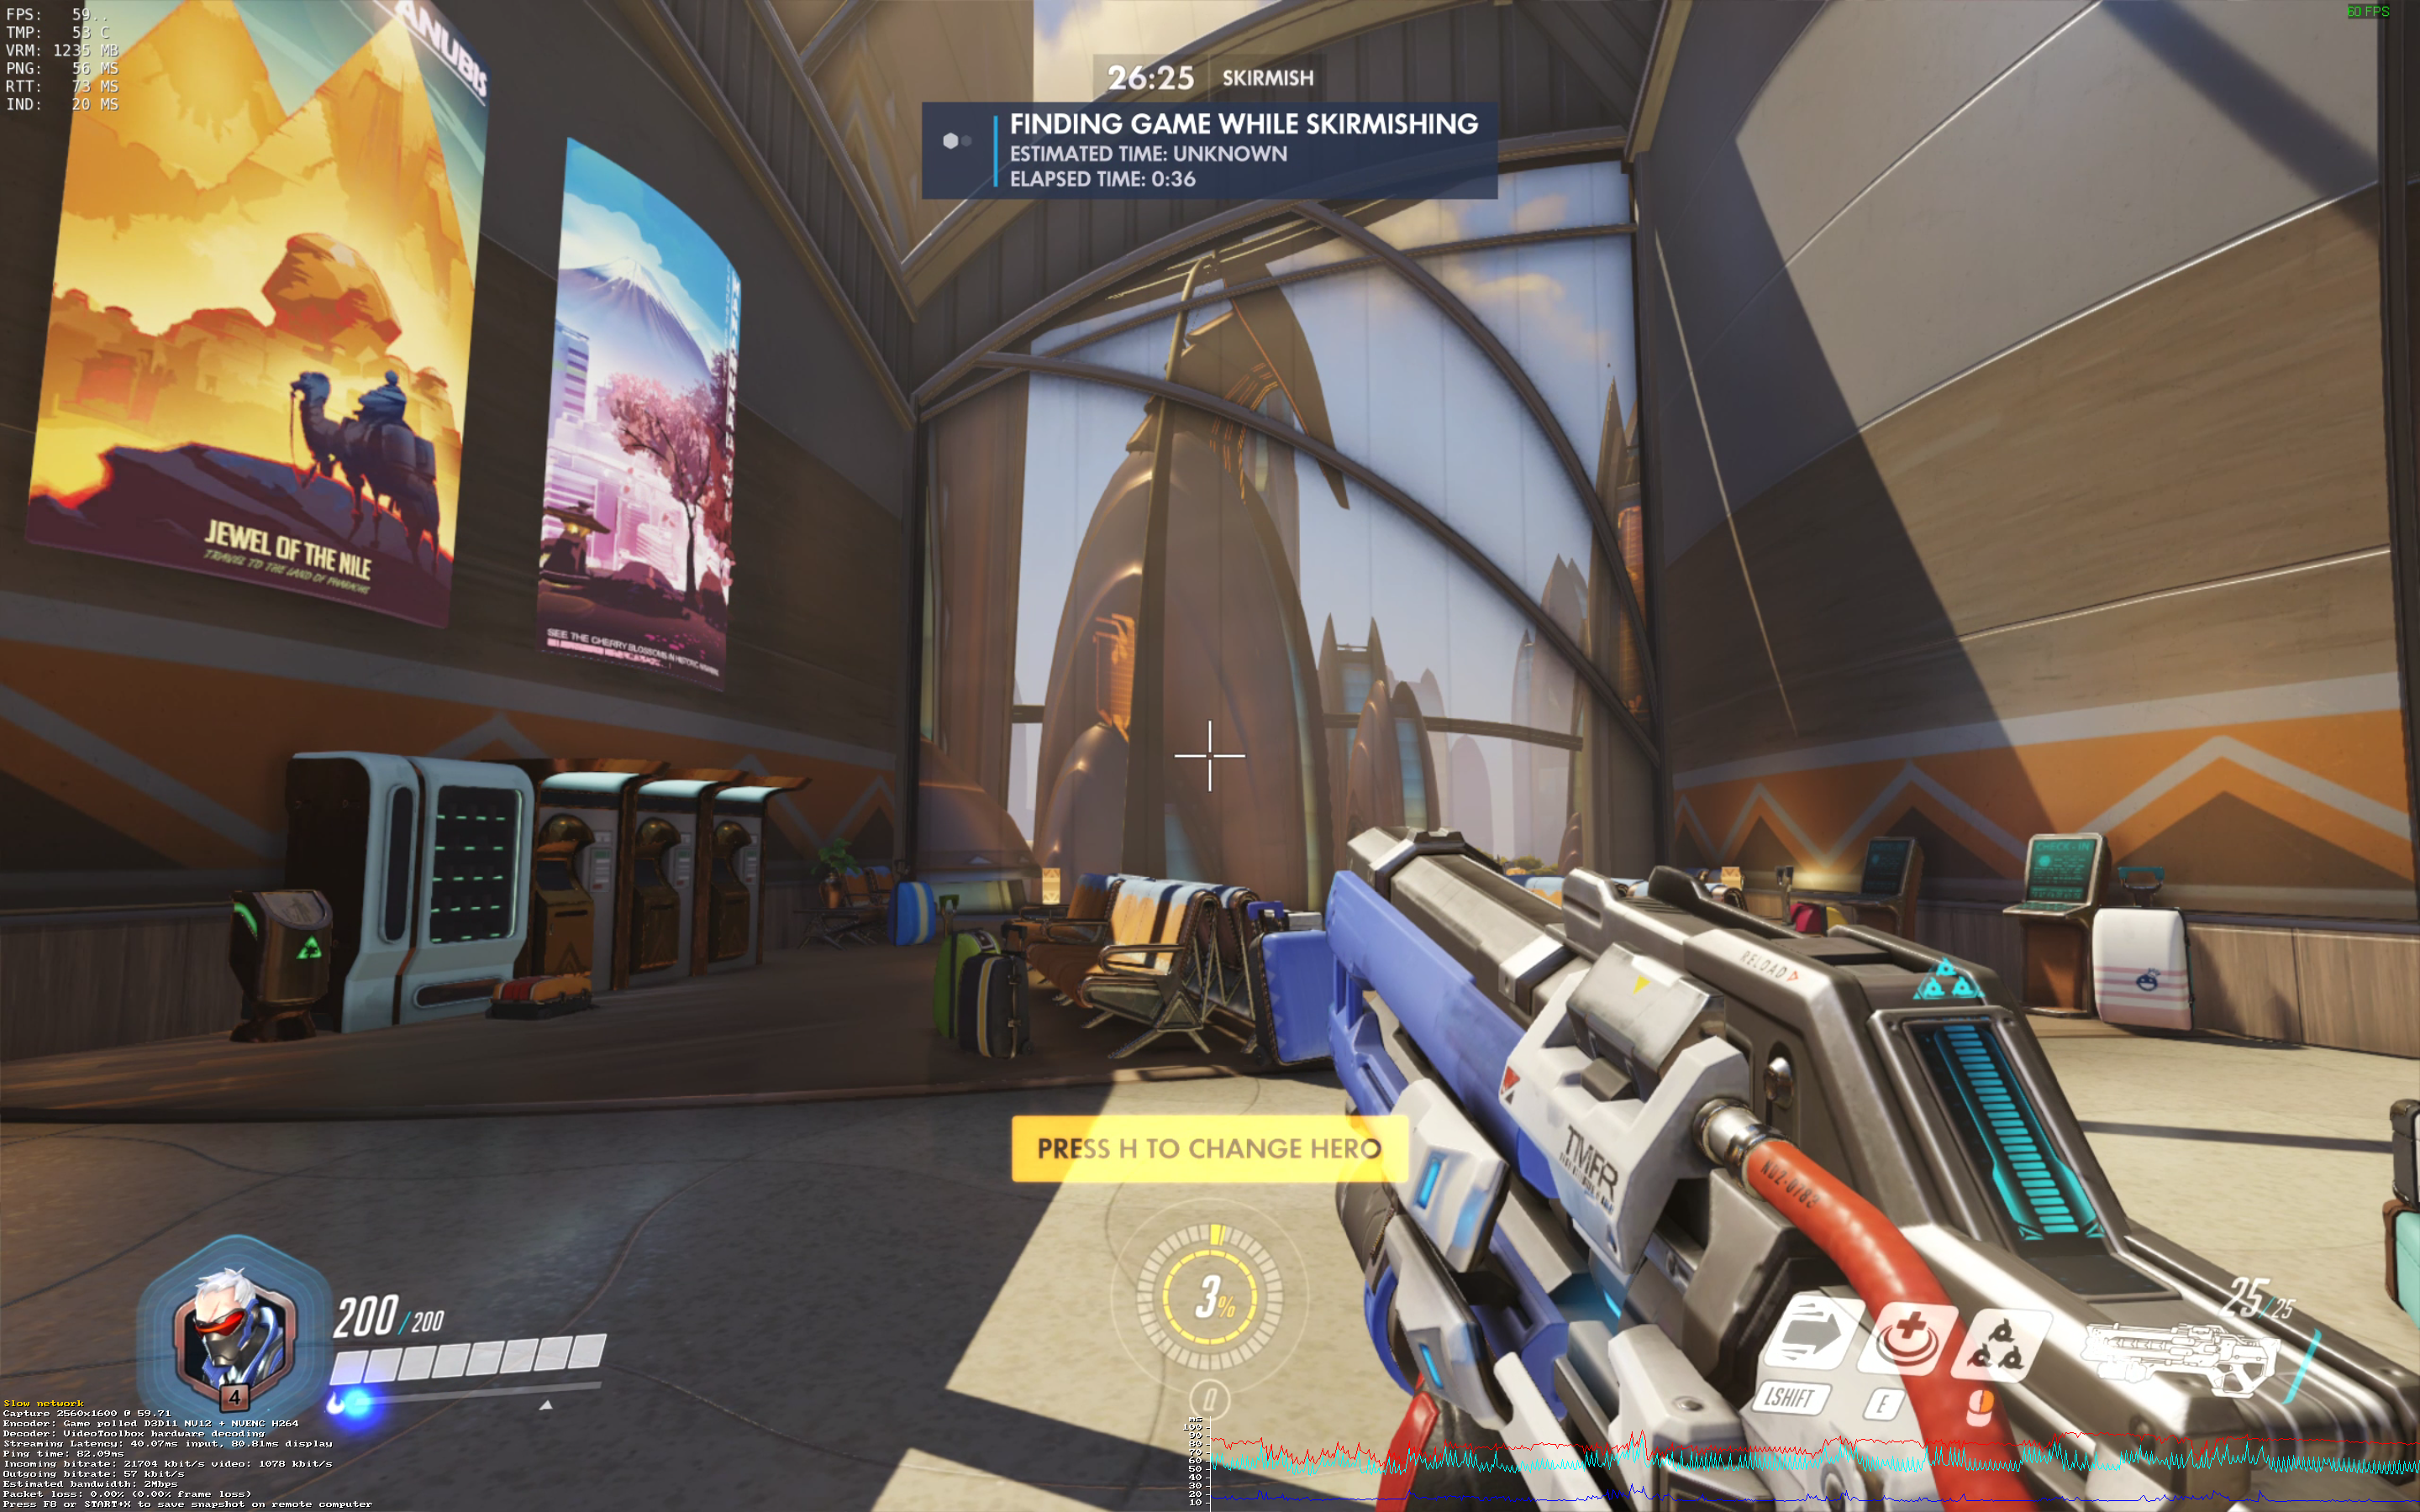
So pretty :)
Some details
Steam In-Home Streaming details after pressing F6 (bottom-left of screen)
- Here you can see all sorts of interesting stats: we’re doing 2560x1600 at 60fps via NVENC
- Latency is around 82ms. Once Azure spreads this tech around to all their datacenters, things should really go down in terms of latency.
- We’re doing a solid 21MBits, though in action it’ll easily hit 30MBits

Steam In-Home Streaming also displays a rolling latency graph (bottom-right of screen)
- Dark blue line is time it took to encode the H264 on the server side
- Light blue line is time it took to transfer to the client side
- Red line is decoding time and display latency
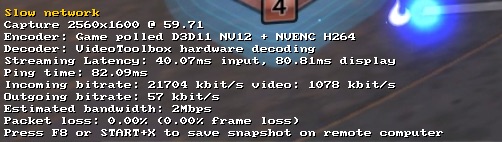
Overwatch’s FPS debugging output (top-left of screen)

Steam’s non-In-Home-Streaming FPS counter (top-right of screen)
Thanks for reading! Hopefully this helps out. My day-to-day job is at Envoy, a startup in San Francisco building pretty cool products for rethinking typically outdated processes in the workplace. We’re hiring fun engineers with a passion for building re-thought tech. Check out our jobs page! And definitely mention if you’re into streaming games :)
Shoutout to @Karan_Batta for helping me get started with the GPU machines there!