Run your own high-end cloud gaming service on EC2
TweetNOTE: This article has been superseded by my more recent one here
How to use EC2 GPU machines + Steam In-Home Streaming + a VPN to play AAA titles on a shitty laptop
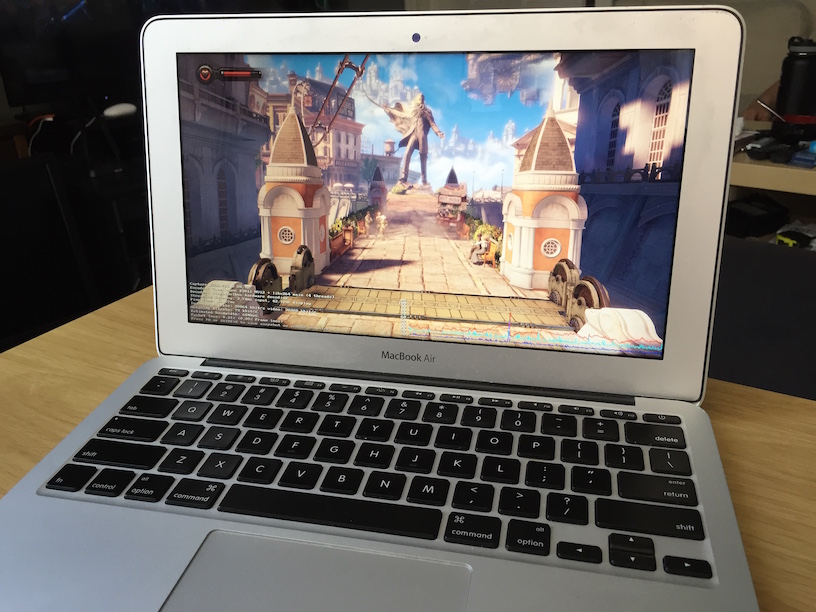
You might have tried a service like the now defunct OnLive. Though personally I’ve played and beat many AAA games on the service, it unfortunately a) had a very limited selection and b) is now gone. I also have a bunch of games on Steam that I’ve played using my eGPU. With the new Macbook though, I won’t be able to continue my low-end-laptop but high-end gaming extravaganza since there’s no Thunderbolt. So why am I not concerned? Steam recently introduced In-Home Streaming, which basically creates a mini-OnLive in your own home with all the same Steam games I played with my eGPU. But… let’s do it over the Internet!
Cost
Playing games this way is actually quite economical – especially when comparing to purchasing a full-on gaming rig. Here are the costs you’ll need to consider:
- GPU Instance runs about $0.11/hr (on a Spot instance, regularly around $0.70/hr)
- Data transfer will be around $0.09/GB, and at a sustained ~10mbit, itll cost you $0.41/hr (4.5GB/hr)
- Updated Apr 25: Hard drive (EBS General Purpose SSD) storage of 100GB is $12.00/mo, or a bit under $0.02/hr
This comes out to around $0.54/hr (Updated Apr 25), not bad, for the cost of a $1000 gaming pc, you get ~1900 hours on much higher-end hardware!
The catch?
This is all fun and games, but you need to make sure of two things:
- You are within 40ms to the closest AWS datacenter (test here) and has GPU instances (Updated Apr 25 brought this up from 20ms, many people reporting it’s just fine at slightly higher latencies)
- You have at least a 10mbit connection and it’s unmetered
Setting it up
- On AWS, create a new EC2 instance. Use these settings:
- Base image should be
Microsoft Windows Server 2012 R2 Base(since Windows still has all the best games)
- Use a
g2.2xlargeinstance (to get an NVIDIA GRID K520 graphics card). Updated Apr 19: There is no point using any larger instances since all they do is just give you more GPUs you can’t use.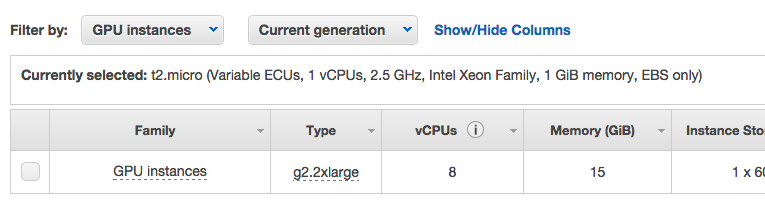
- Use a Spot instance, it’s significantly cheaper (1/7th the regular cost) than regular instances
- For storage, I recommend at least 100GB (Updated Apr 19: was 60GB) (so you can install lots of fancy games)
- Also for storage if you’re using spot instances, make sure your primary disk doesn’t get deleted on termination
- For the Security Group, i’d recommend just adding type
All traffic - Finally, for the key pair, create a new one since you’ll need one for Windows (to retrieve the password)
- Base image should be
-
Once your spot instance is assigned, use Microsoft Remote Desktop to connect to it (get it here on a Mac). The username is
Administratorand the password you’ll need to retrieve from the EC2 Console. Once inside, make sure to install TightVNC server and use Screen Sharing (on a Mac, Updated Apt 19: or alternatively Screens which has better clipboard handling) to connect to the server. VNC is necessary so that the server uses the proper video card for rendering. -
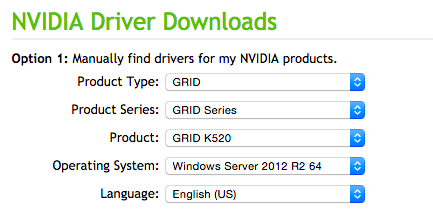
Install the NVIDIA K520 drivers from the Nvidia website
-
In order to make it actually use the video card, you’ll need to completely remove the default driver. Open up Device Manager, and a) disable the
Microsoft Basic Display Adapter, b) uninstall it and c) delete the driver fileC:\Windows\System32\Drivers\BasicDisplay.sys(see instructions for how to delete protected drivers here). Reboot and VNC back in.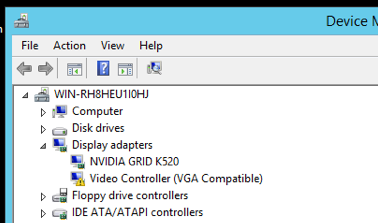
-
Start the Windows Audio Service as per the instructions here. Also, since you’re on EC2, those machines do not virtualize a sound card. So install VB-Cable so you can get sound. Updated Apr 25: Alternatively, you can install the more-commercial Razer Surround to simulate 5.1 – it’s pretty cool.
-
Updated Apr 19: Install OpenVPN via the instructions here. Make sure to use the TAP interface so Steam’s multicast discovery gets forwarded. Here is my server config and client config. I personally use TunnelBlick on my Mac as the client.
Updated May 7: You can alternatively use ZeroTier for both the server and client which is easier to set up, and still free, but less configurable. Remember to create a network on their website and enabling IP addressing. -
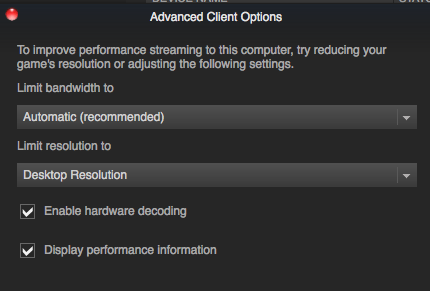
Install Steam and get yourself on the Beta channel (available in the preferences). Also, start downloading whatever games you’ll want to stream. Oh and on your own Steam installation, make sure to turn on Hardware Decoding in the Steam settings, and I also recommend turning on Display Performance Information.
- Start gamin!
Performance
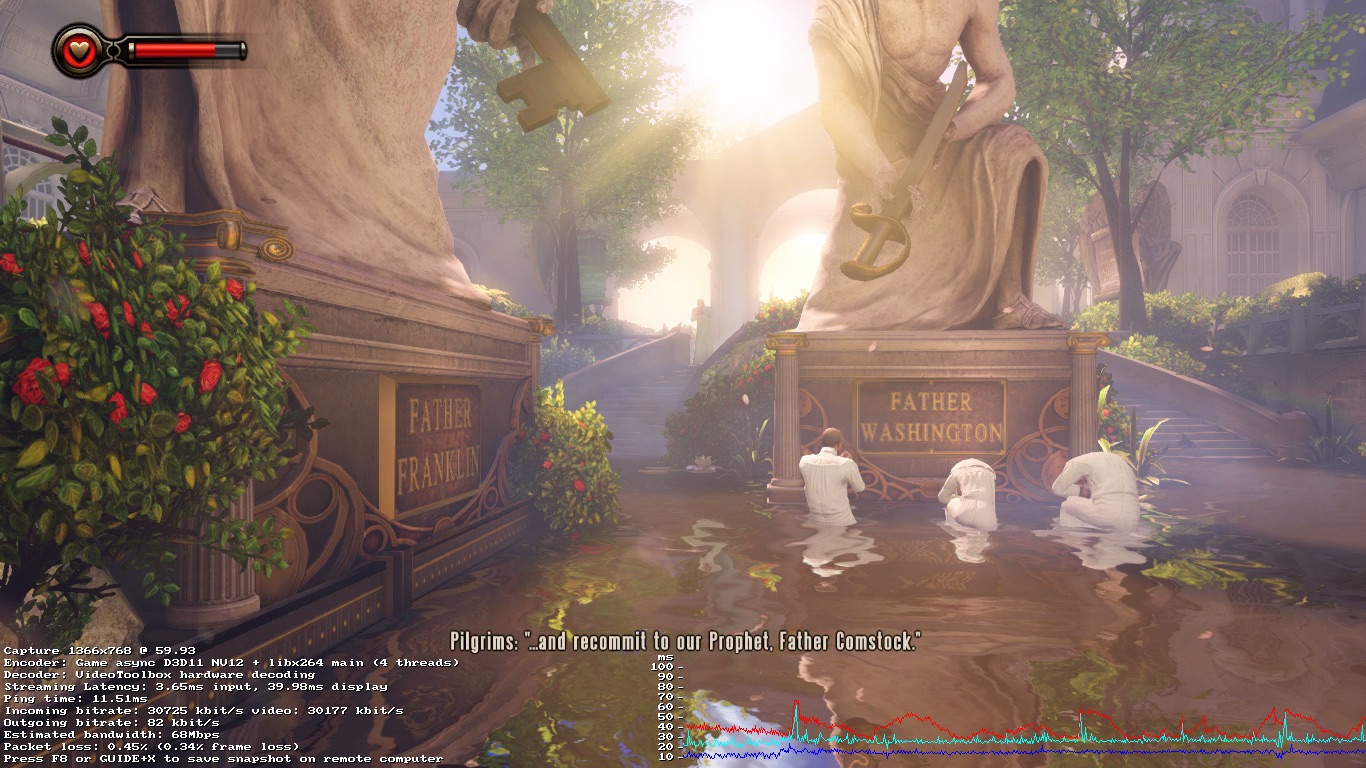
While playing, make sure to hit F6 to see the latency graph. Anything above 50ms will make the delay somewhat noticable, though I’ve played with delays up to 100ms. It just takes some getting used to and before you know it you won’t even know you’re streaming your games from a computer far far away.
One other thing you should do is hit F8 while playing (note that sometimes this will cause the client to crash, but the file will still get written). F6 will do a dump of stats in the C:\Program Files (x86)\Steam\logs\streaming_log.txt file on the server. Open it up to see detailed latency timings. Here’s an example of the interesting lines:
"AvgPingMS"       "11.066625595092773"

"AvgCaptureMS"    "4.555628776550293"
"AvgConvertMS"    "0.023172963410615921"
"AvgEncodeMS"     "5.5545558929443359"
"AvgNetworkMS"    "7.0888233184814453"
"AvgDecodeMS"     "3.7478375434875488"
"AvgDisplayMS"    "6.3670969009399414"

"AvgFrameMS"      "27.798770904541016"
"AvgFPS"          "57.622333526611328"
Unfortunately Steam doesnt support pulling the video from the H264 encoder on the GRID’s NvFBC (which would reduce AvgEncodeMS a bunch). If you were running a GTX video card locally this is one thing that’d make it faster than using EC2 (in addition to largely decreasing NetworkMS).
See more information about this file in the Steam In-Home Streaming Steam Group.
Trouble?
-
If you have the VPN running and you can’t get your client computer to see the server Steam, usually restarting Steam on the server will get the client to see it again. It’s a bit of a pain since you’ll need to VNC into the computer to restart things.
Updated Apr 26: You can usewiresharkandnetcatto pipe broadcast pings from a mac to the EC2 machine.tshark -T fields -e data -l 'udp and dst port 27036' | script -q /dev/null xxd -r -p | nc -b tap0 -u 10.8.0.1 27036 > /dev/nullSee my up.sh and down.sh for automating this with the OpenVPN connection. You need to do this because the mac Steam client only broadcasts to one interface, i.e. not your VPN tunnel.
-
If the game freezes, the way to get it out of it’s broken state is to Microsoft Remote Desktop in, close things, then go back in via VNC to restore Steam, etc.
-
Updated Apr 19: If your Steam client freezes after logging in, restart the Steam server.
-
Updated Apr 19: If you only see a black screen though you do hear sound, it usually means you need adjust the MTU of the VPN. See the OpenVPN discussion. Also, see the Steam In-Home Streaming discussion about this for more ideas. Updated Apr 26: I’ve also been told that switching OpenVPN to TCP might fix things, though that seems more of a workaround since now you don’t get the benefits of UDP.
Summary
If you have a) a fast internet connection and b) you’re near an AWS datacenter with GPU instances, in my opinion, this is actually quite practical. Not only performance-wise, but it’s also quite economical.
Also, RIP OnLive. Loved those guys.
Happy gaming!